Help & How-To
1. Getting started
- Create your account. Go to the sign-in page and register with an email and a password (at least 10 characters). Your plan sets how many events one account can hold.
- Pick an occasion, then name your page. On first sign-in you'll choose an
event type (wedding, birthday, baptism, and more), set your name(s), and a
page link (the
?e=slug at the end of your RSVP URL). You can change all of this later. - You land on the dashboard. The left sidebar groups the sections into Setup (Overview, Event Details, Design, Questions), Guests (Guest List, Responses, Table Finder), and Account (Plan & Billing, Account). On a phone the sidebar collapses into a Menu button with the current section shown as the page title.
2. Overview
Your at-a-glance status page and where you publish.
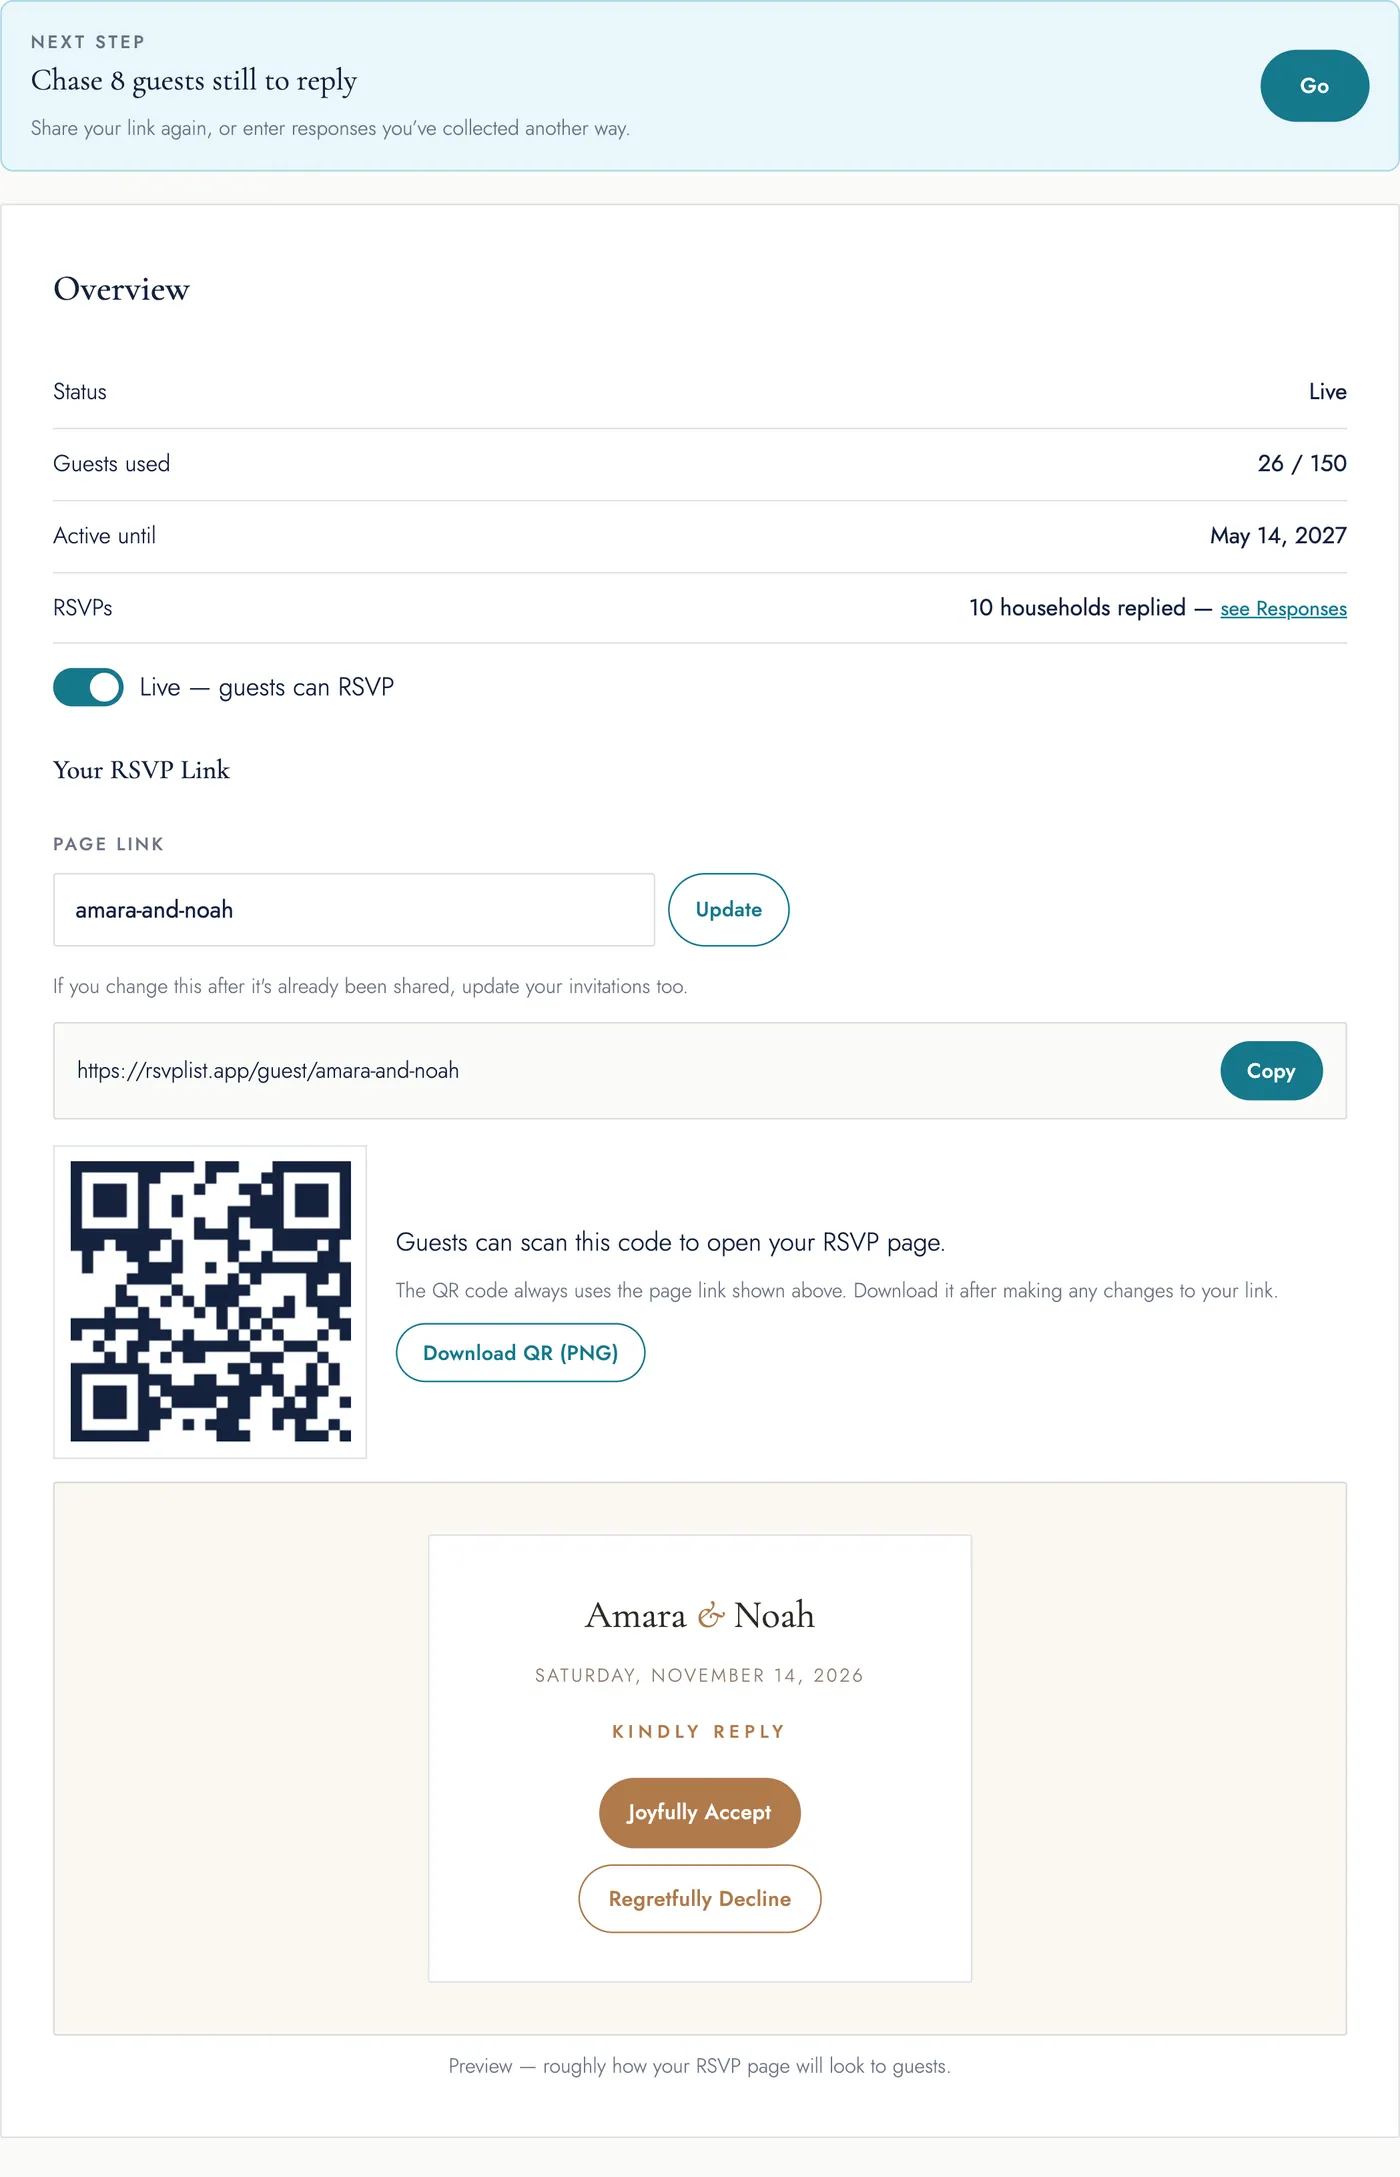
- Next step and Set up your RSVP page — a suggested action and a short checklist (event details, guest list, publish, plus optional design and questions) that link straight to each section. The checklist hides itself once the required steps are done, or you can dismiss it with Hide this checklist.
- Status — Draft (hidden from guests) or Live.
- Guests used — e.g.
38 / 50against your plan's limit. - Active until — the date your page stops being visible to guests (see Plan & Billing). Only appears once you've published.
- RSVPs — a one-line count of households that have replied, linking to Responses, where the full numbers (confirmed, declined, awaiting, headcount, plus-ones) and the choose-one / choose-several breakdown now live.
- Publish toggle — flip this to Live when you're ready for guests to RSVP. The free plan (50 guests) publishes just like the paid ones.
- Your RSVP link and QR code — copy the link or download its QR code as a PNG for printed or digital invitations. You can edit the page link here any time; if you've already shared it, replace your old link and QR code too.
- Preview — a mock-up of your RSVP card with your colors, names, and date.
3. Event Details
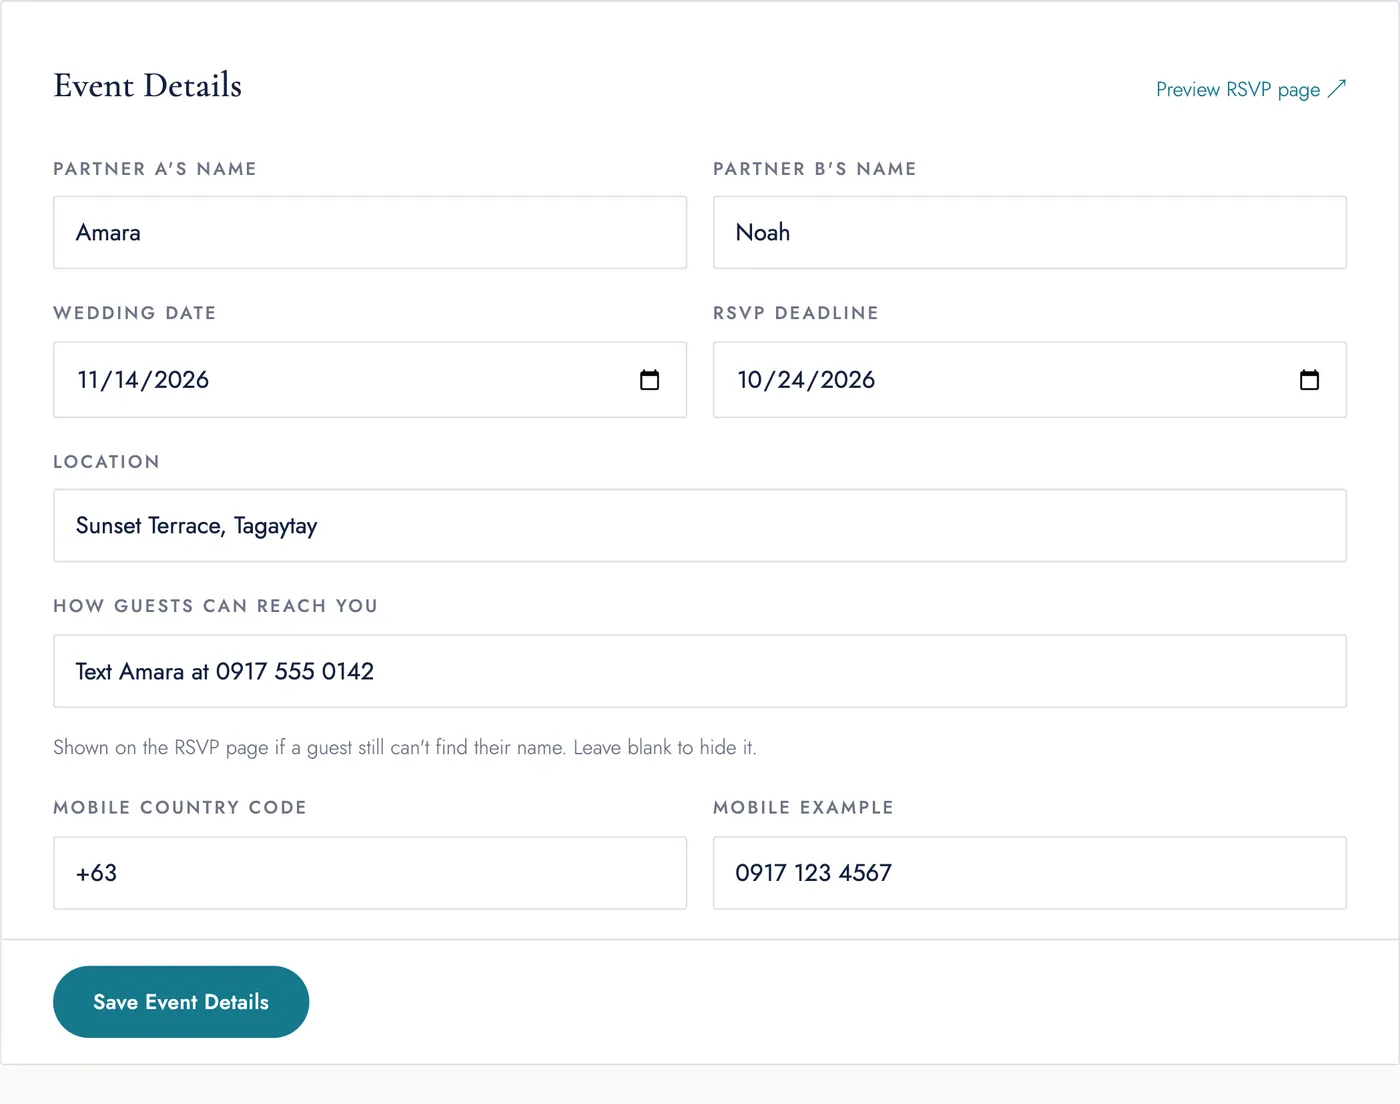
The wording guests see on the page and in their confirmation email.
| Field | What it does |
|---|---|
| Partner A / Partner B names | Shown as the headline on the RSVP page and in emails. |
| Event Date | Displayed as a full date ("Saturday, November 15, 2026"). |
| RSVP Deadline | Optional. After this date the page shows a closed state and won't accept replies. Evaluated as end-of-day Manila time. |
| Location | Free text — venue name, city, or "details to follow." |
| How guests can reach you | Shown only when a guest can't find their name (e.g. "Text Ericka at 0917 123 4567"). Leave blank to hide it. |
| Guests' mobile number country | The country the RSVP form's phone field starts on, and the rules used to check numbers. Guests living abroad can switch to their own country. |
Click Save Event Details when done.
4. Design
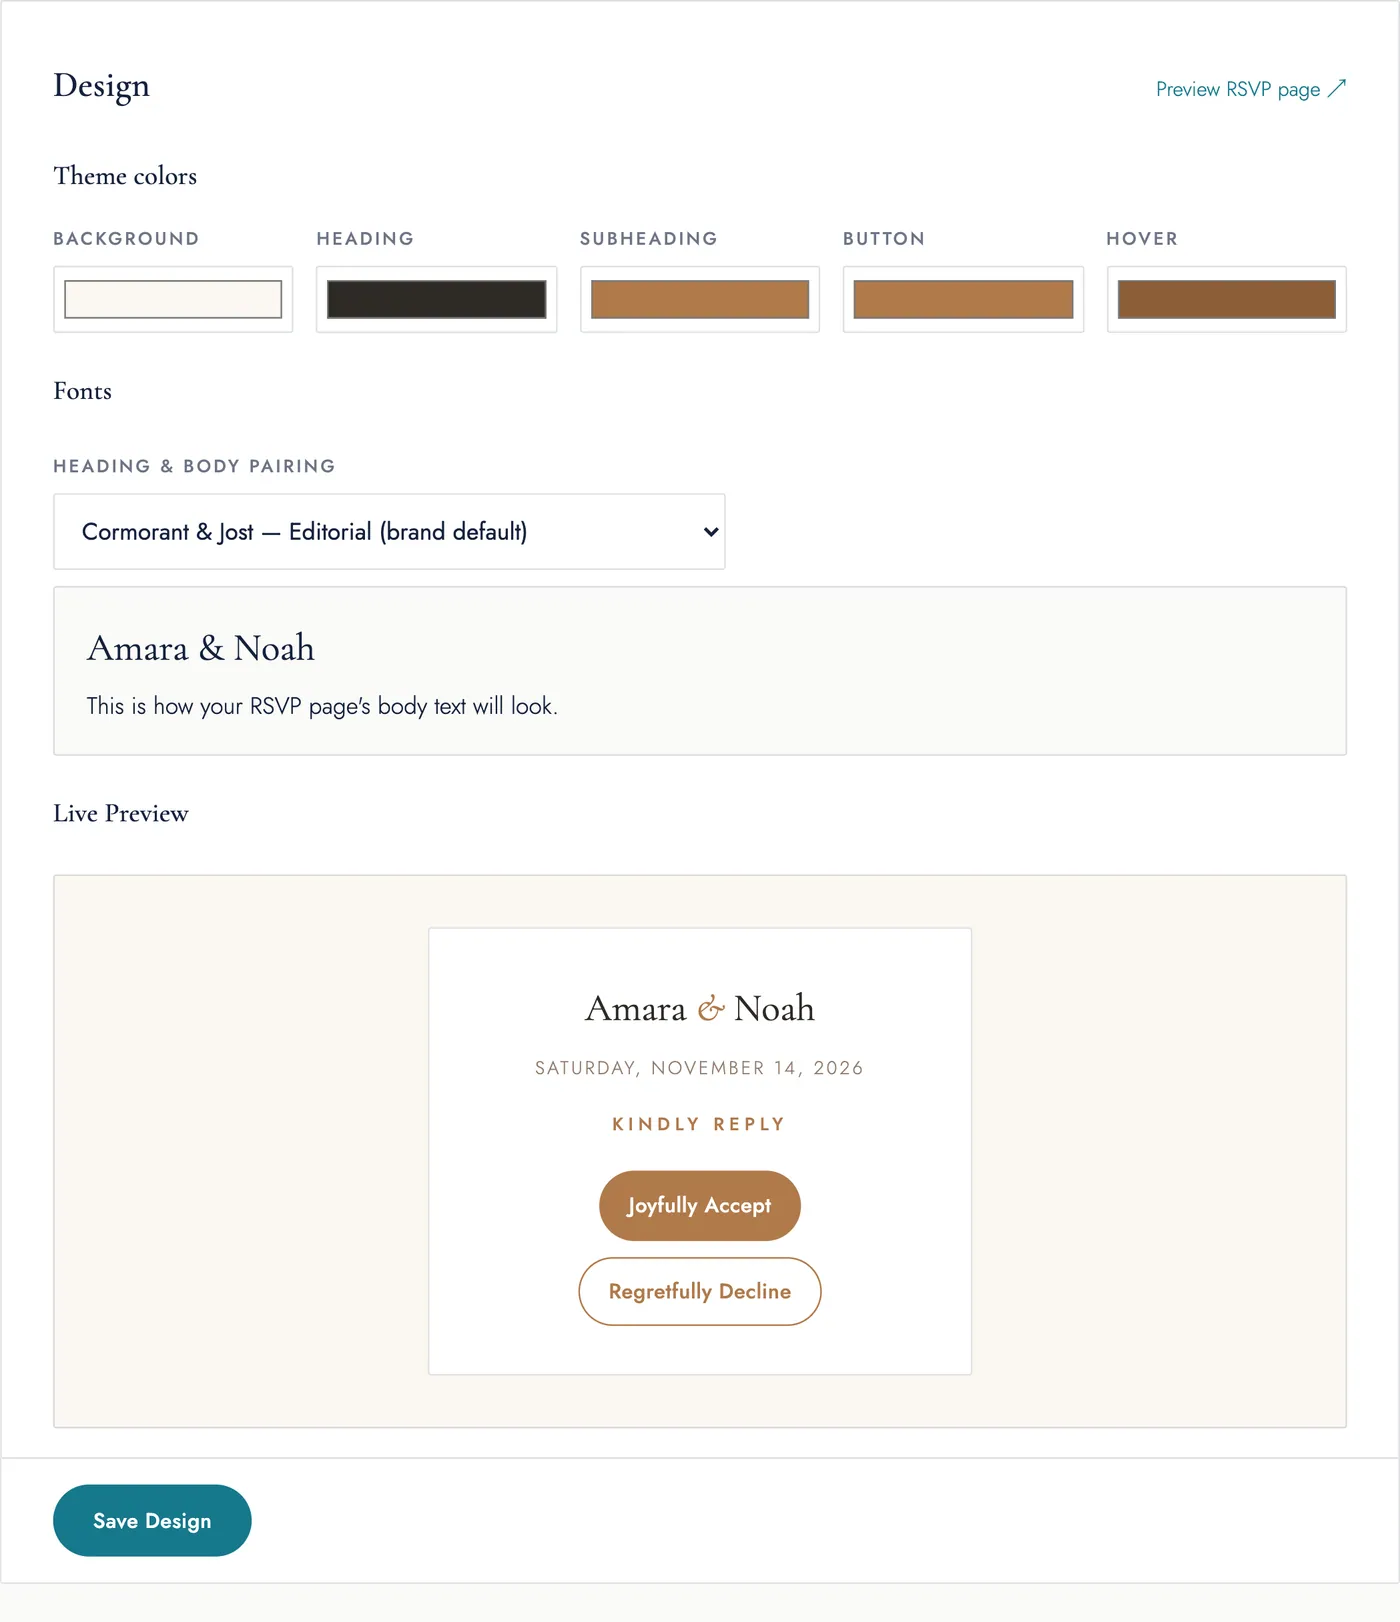
Formerly “Theme & Fonts.” Controls how your RSVP page looks to guests.
- Five colors — Background, Heading, Subheading, Button, and Hover. Use the color swatches; the Live Preview updates as you go.
- Font pairing — one of 7 curated heading + body combinations. Defaults to Cormorant Garamond + Jost.
- Body text and the accept/decline pill colors are set automatically from your palette — that keeps the picker simple and the page readable.
Click Save Design. Changes are live for guests immediately after saving.
5. Questions
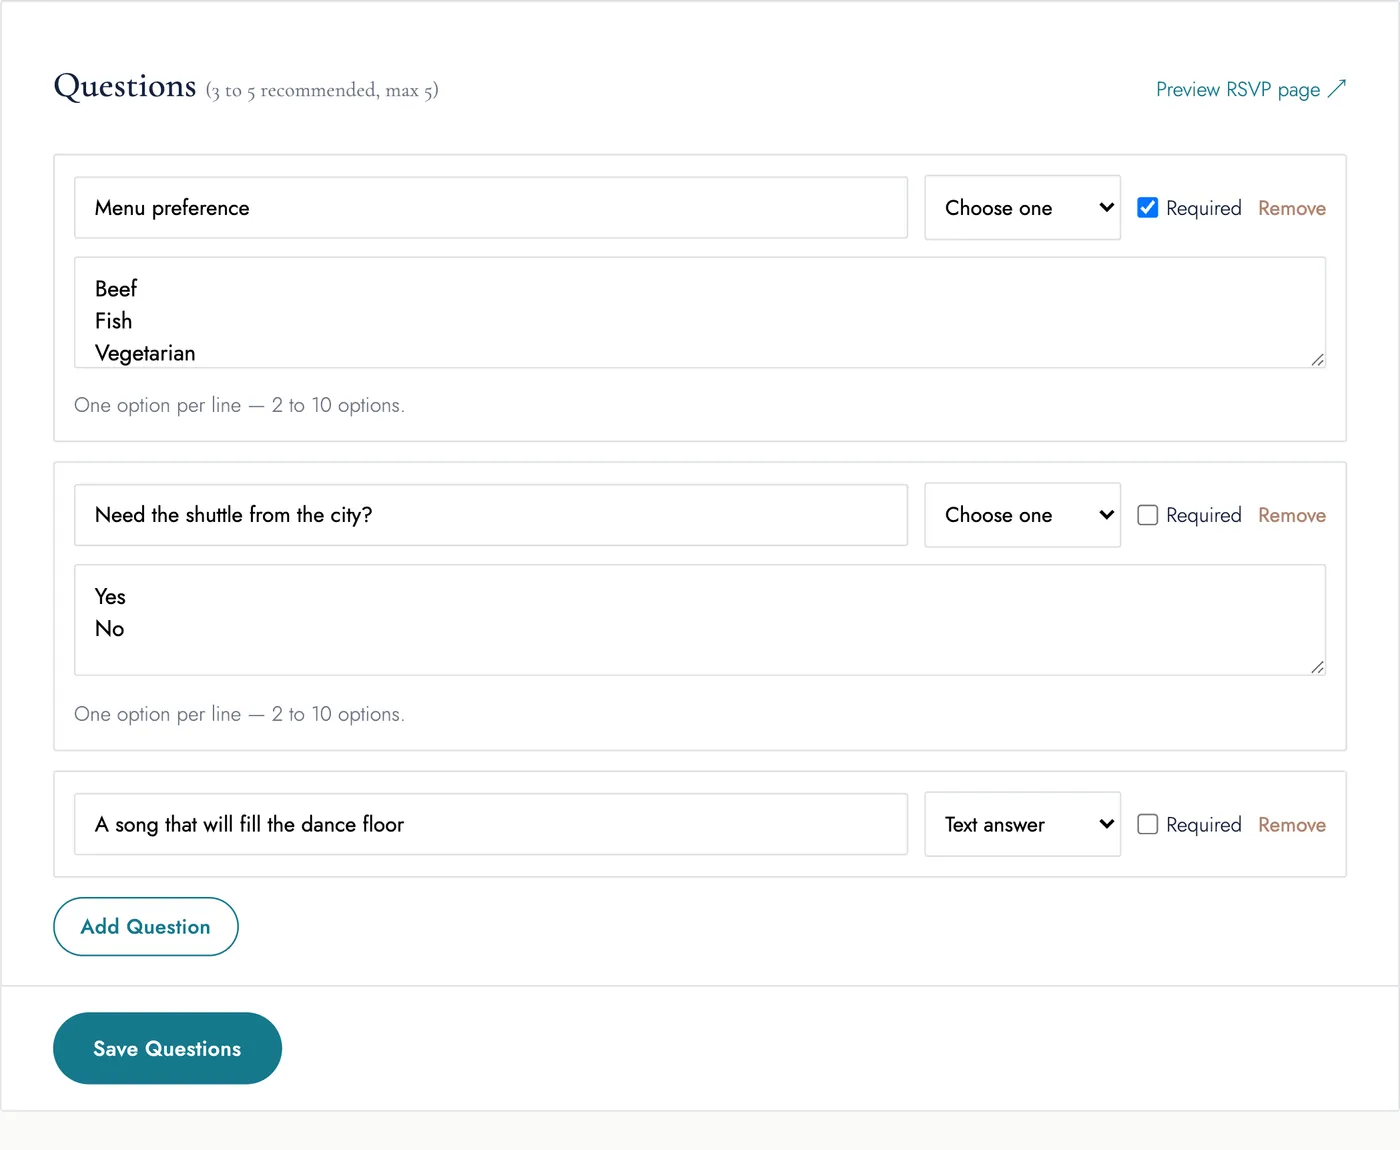
Up to 5 questions shown to every household during RSVP. For each one:
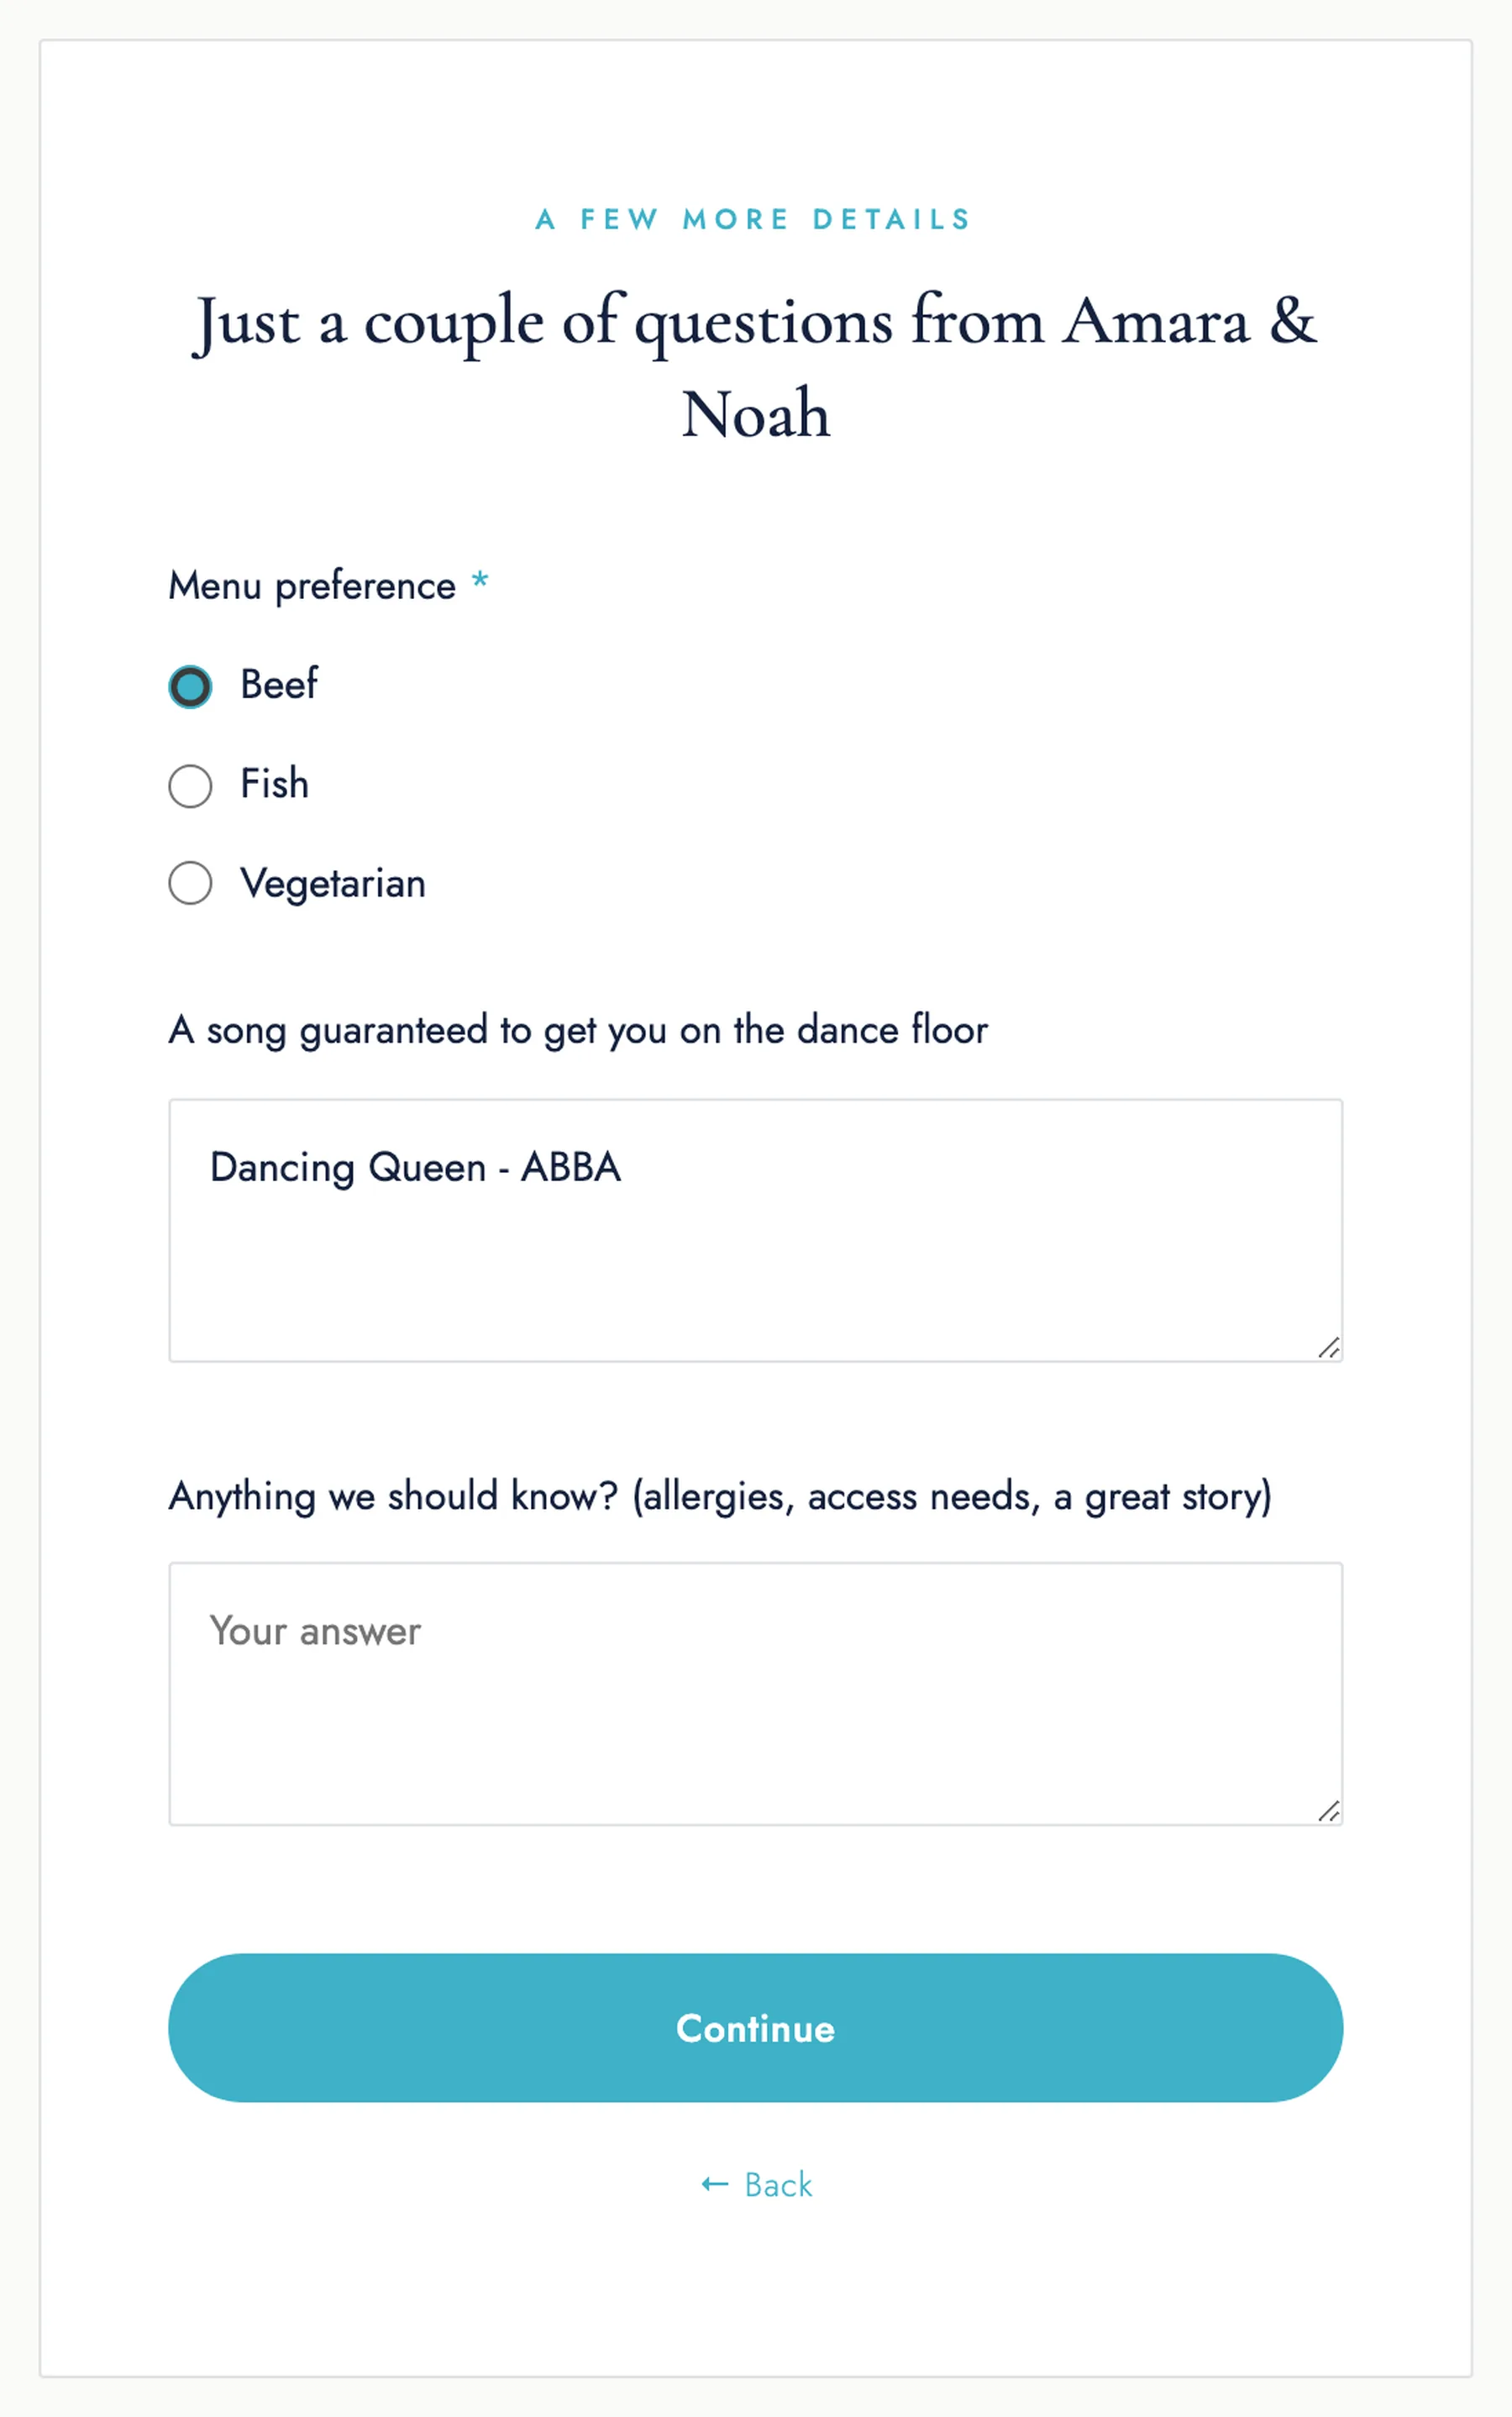
- Label — the question text ("Song request?", "Dietary restrictions?").
- Type — Text answer (free typing), Choose one (radio buttons), or Choose several (checkboxes).
- Options — for the two choice types, one per line, 2 to 10 options.
- Required — tick to make the household answer before submitting.
Use Add Question, then Save Questions. Answers appear per household under Responses and in the CSV export; choice answers are also totalled on the Overview.
6. Guest List
Add one at a time
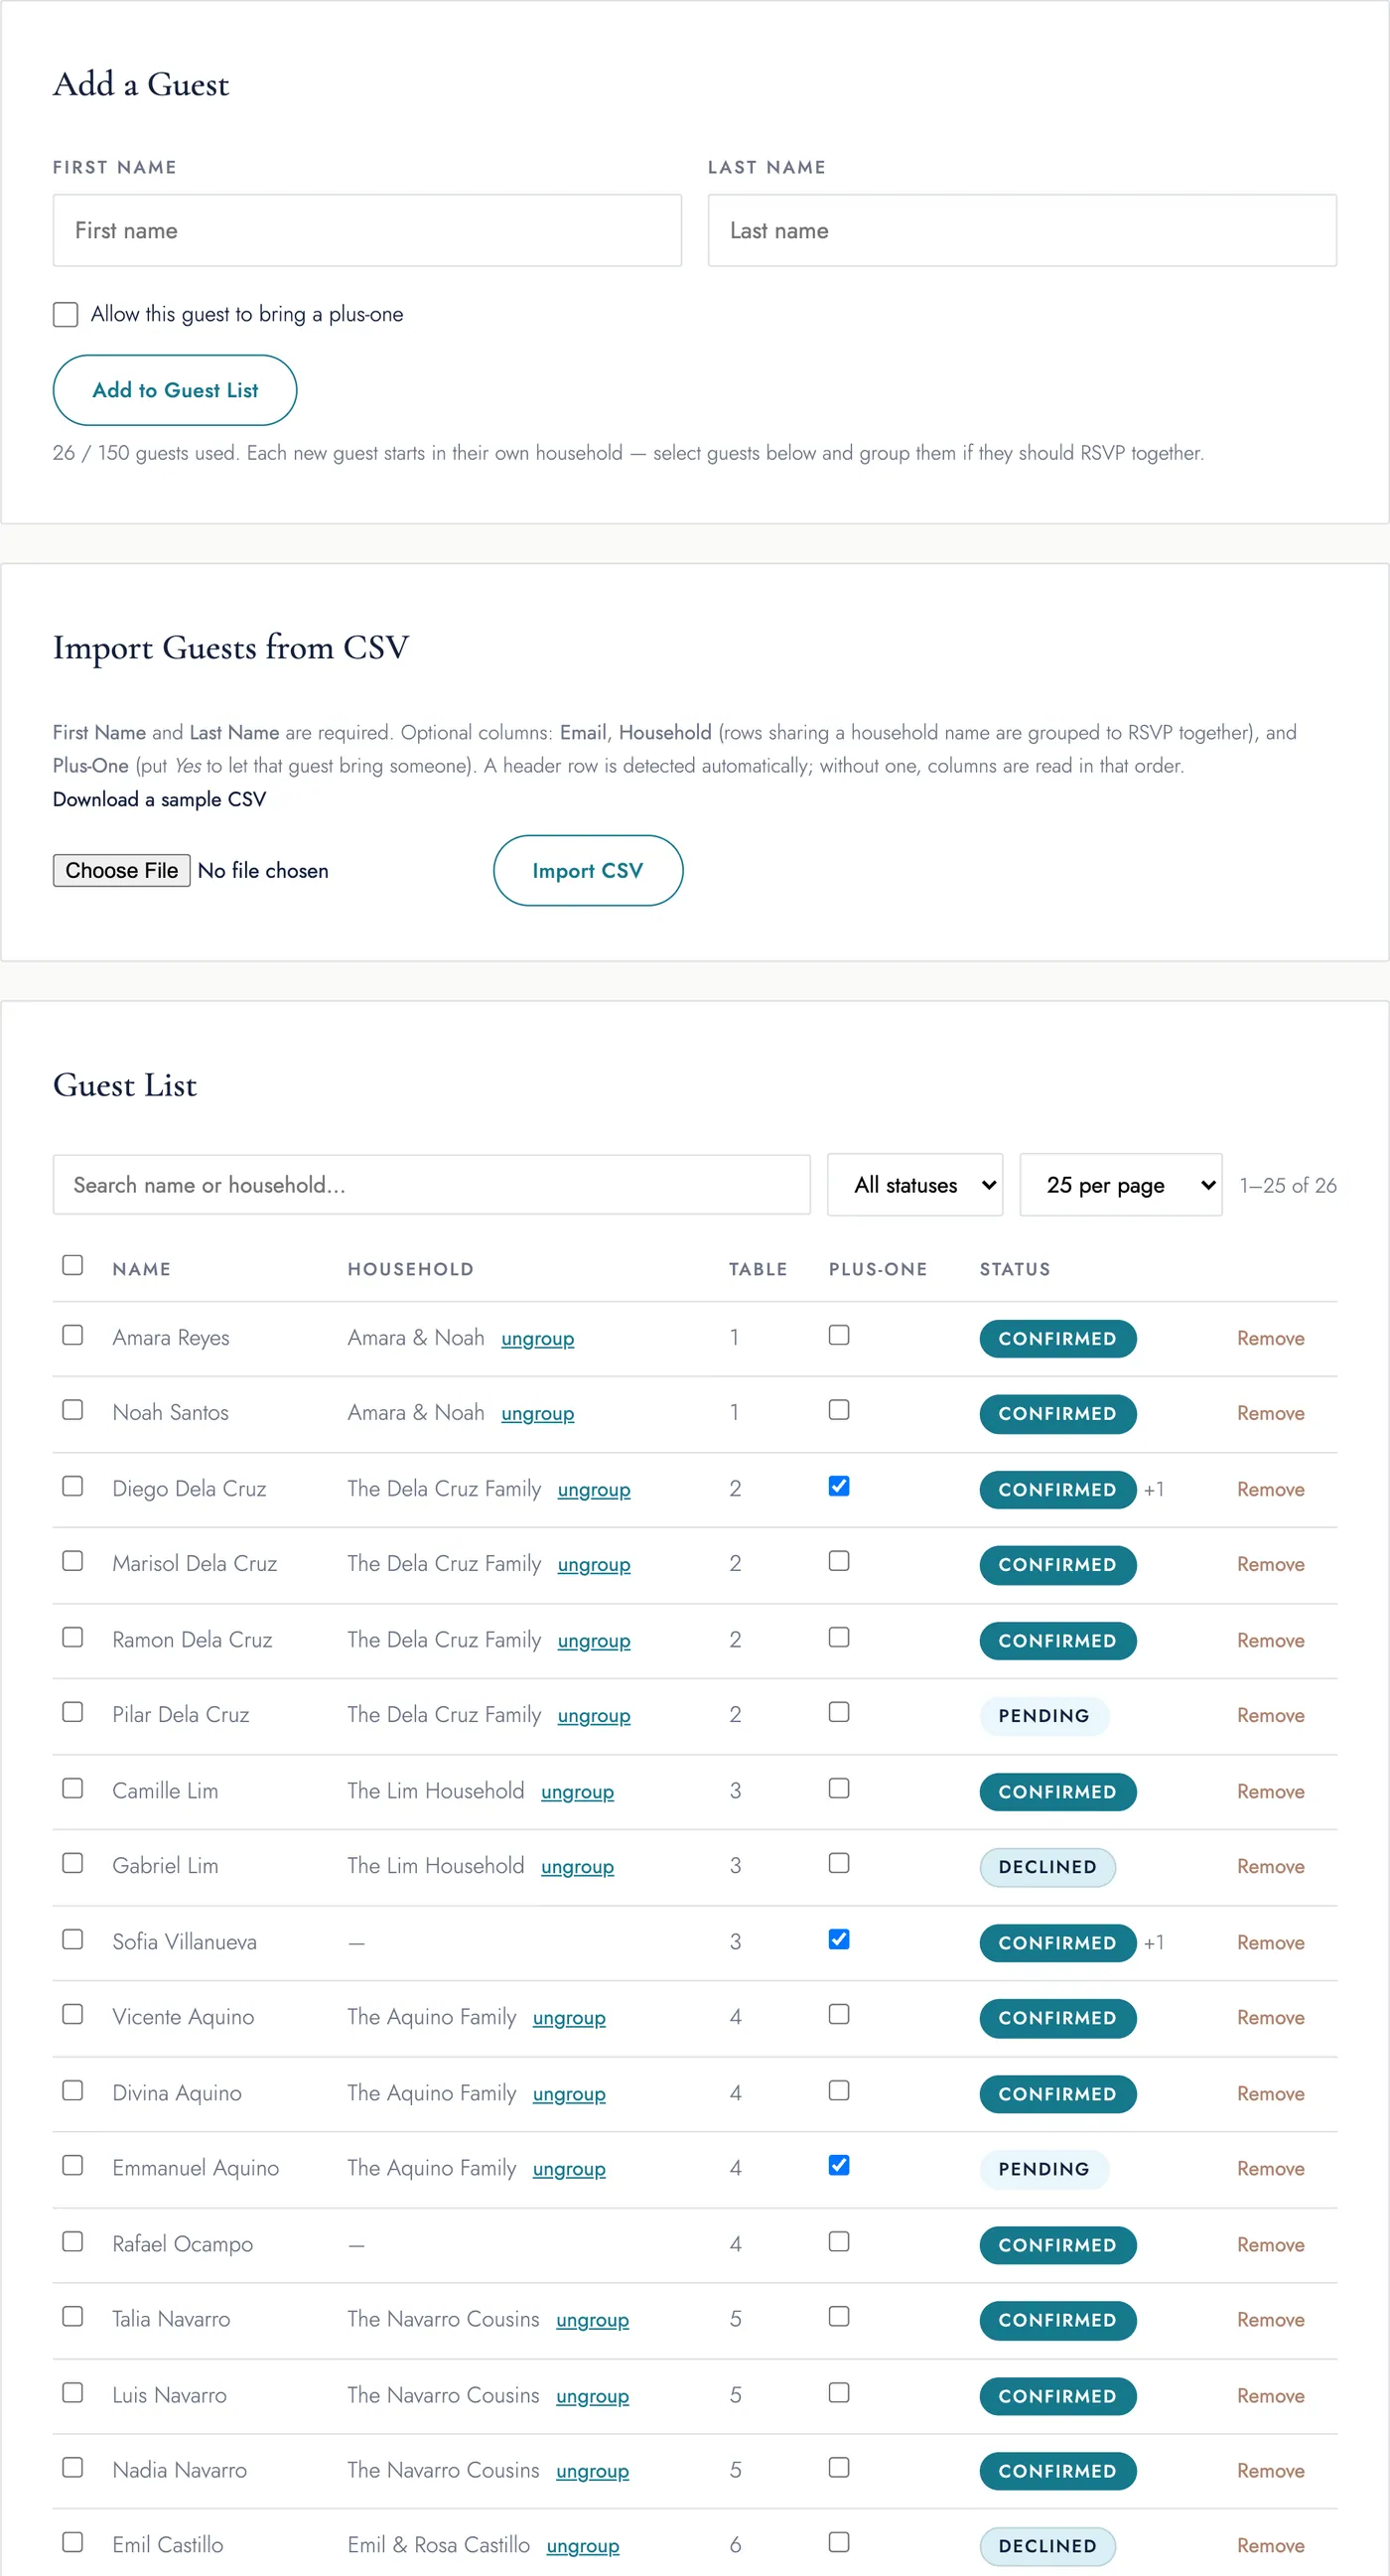
Enter a first and last name, optionally tick Allow this guest to bring a plus-one, and click Add to Guest List. Each new guest starts in their own household.
Import from CSV
Click Download a sample CSV for the format. Columns:
| Column | Required? | Notes |
|---|---|---|
| First Name | Yes | |
| Last Name | Yes | |
| No | Used for the confirmation email if the guest doesn't enter one. | |
| Household | No | Rows sharing the same household name are grouped into one invitation on import. |
| Plus-One | No | Put Yes to let that guest bring someone. |
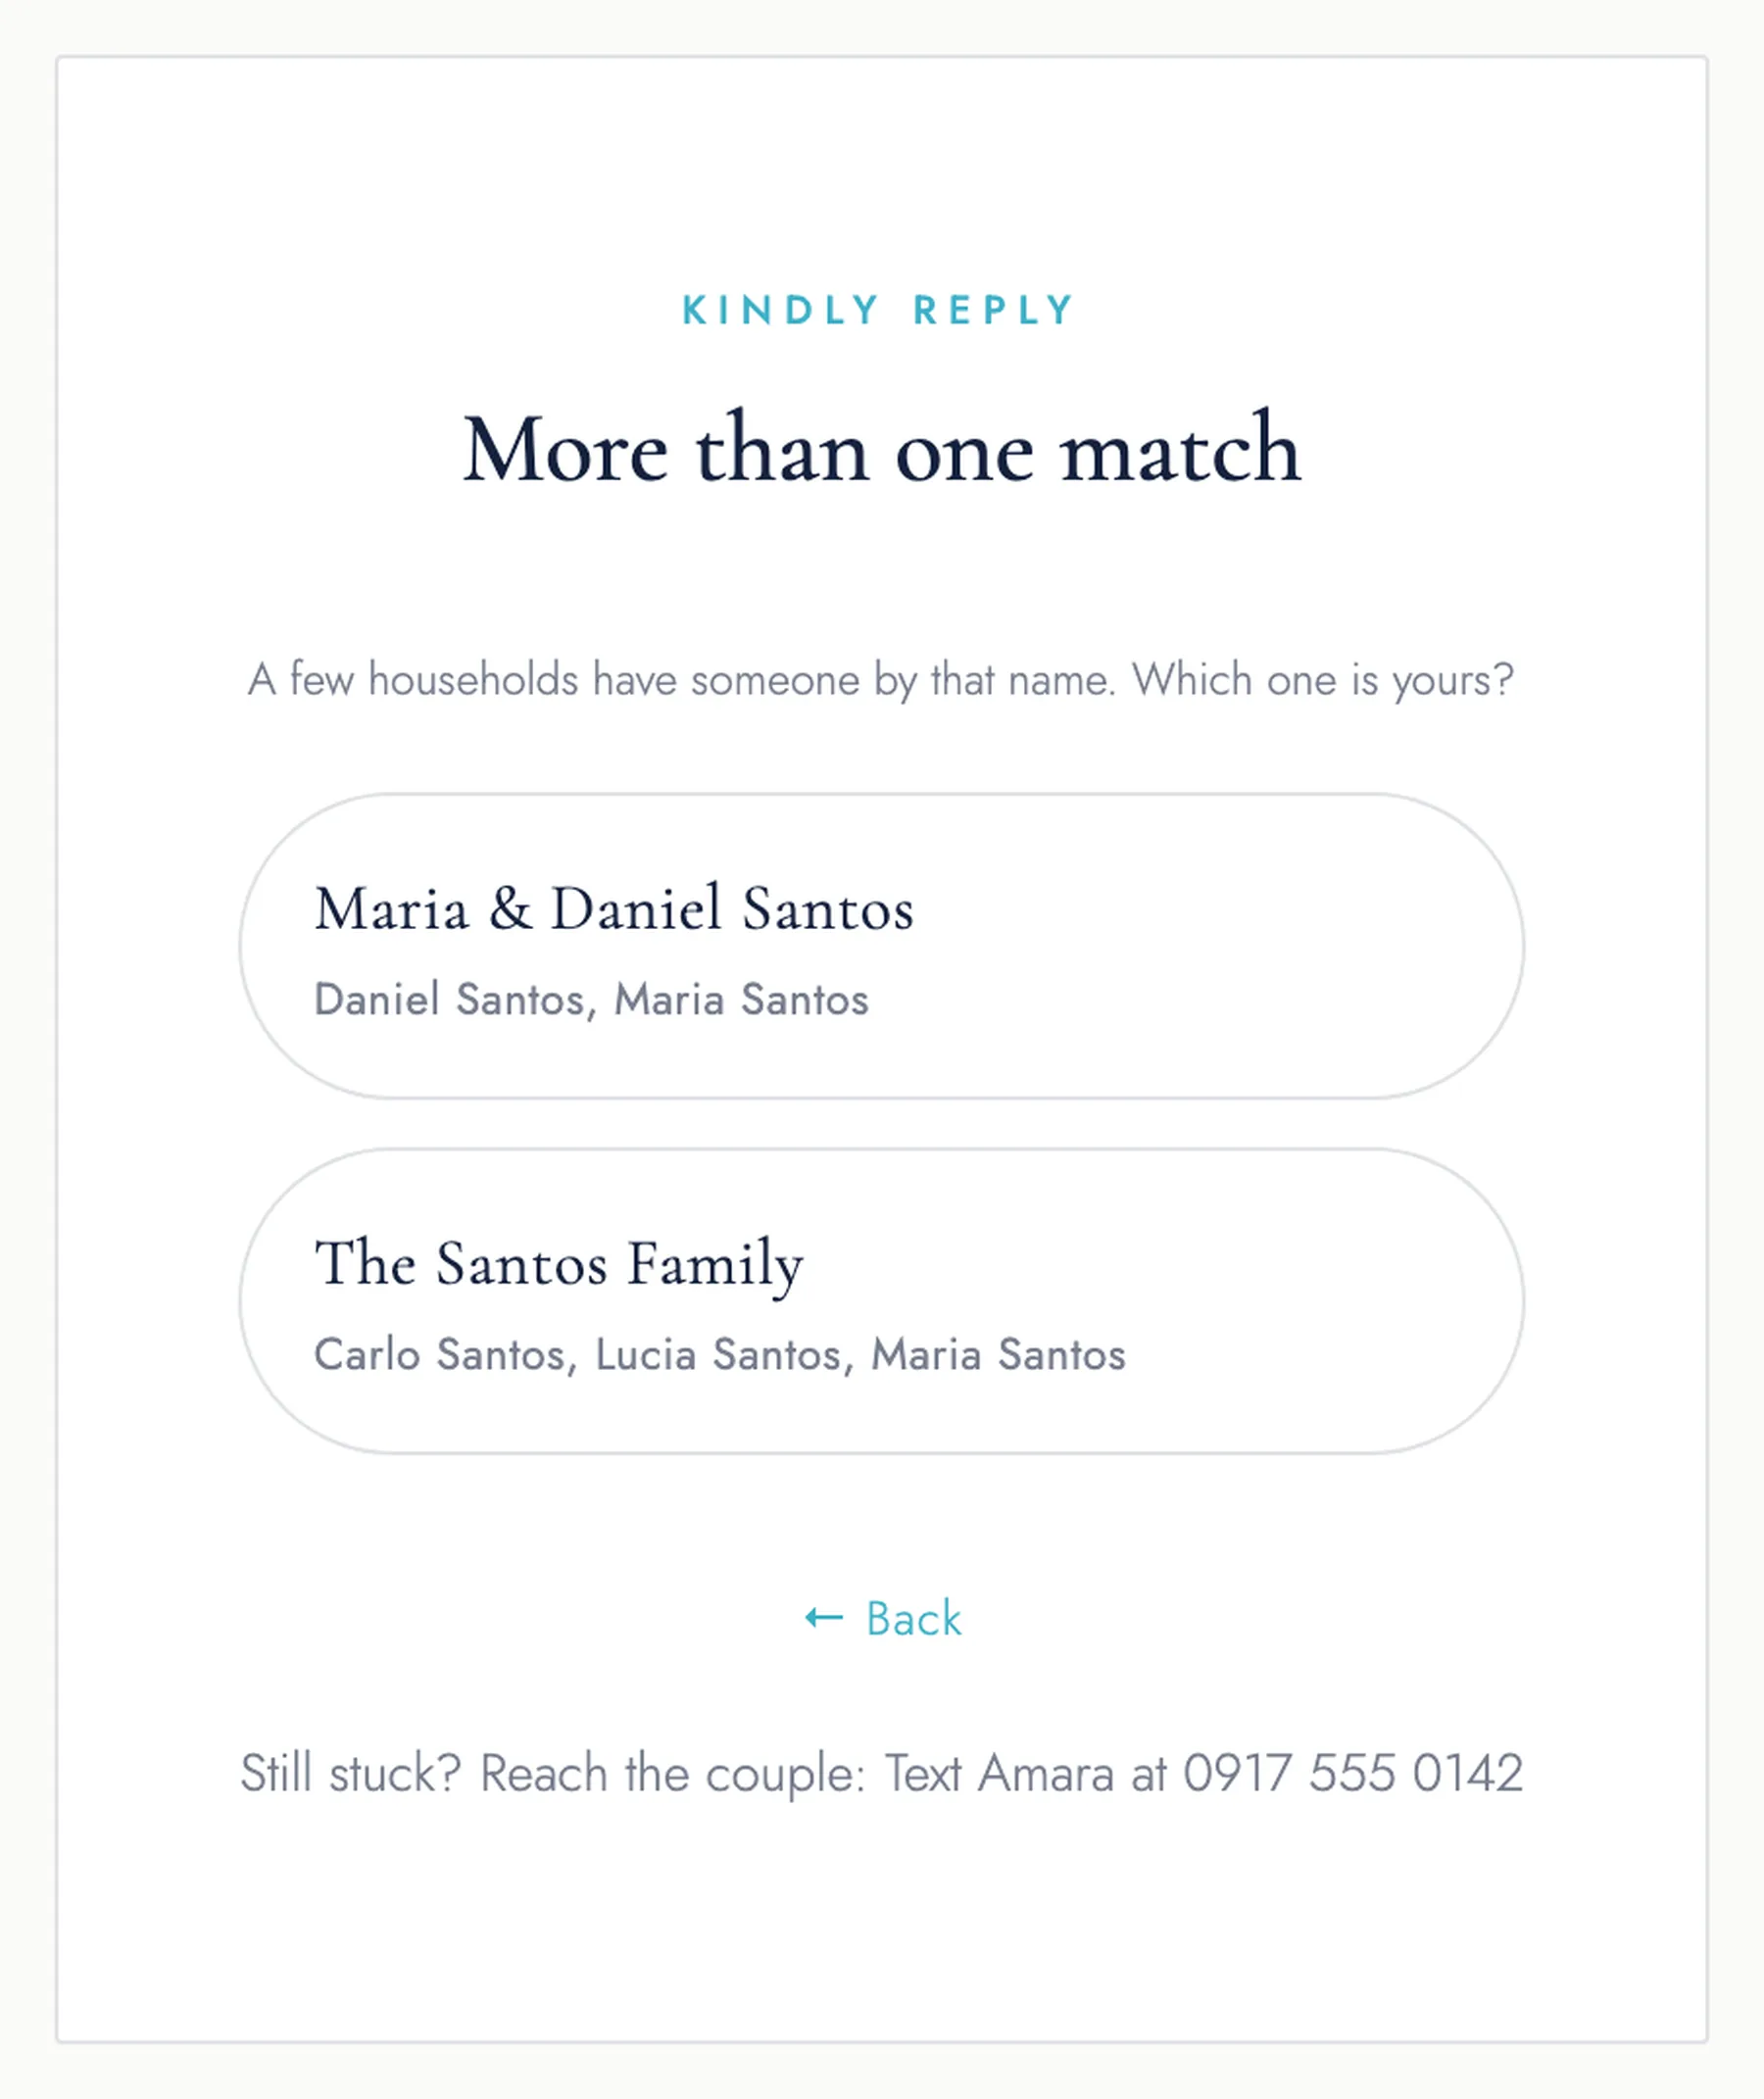
A header row is detected automatically; without one, columns are read in the order above. Duplicate names are allowed — real lists have two "Maria Santos", and the guest lookup sorts them out by household.
Search, filter & bulk actions
Above the list: a search box (name or household), a status filter (confirmed / declined / pending), and a rows-per-page selector (25, 50, or 100); long lists paginate. Tick one or more rows to reveal the bulk bar — group into a household, assign a table number, allow or remove a plus-one, export just the selected guests, or remove them. When a bulk action reaches guests hidden by the current search or page, it names them and asks you to confirm first.
Households (grouping)
A household is one invitation that RSVPs together. To combine people: tick their checkboxes in the Guest List, type a household name ("The Dela Cruz Family"), and click Group into household. Use ungroup next to a name to pull someone back out into their own household.
Plus-ones
Toggle the Plus-one checkbox on any guest row. Only guests marked here see the "bringing a guest" option when they RSVP.
Removing a guest
Click Remove. A banner tells you exactly what was deleted (their RSVP, and the household's shared note/answers if they were the last member) and offers Undo right away, which recreates the guest and re-links their response where possible.
7. Responses
One editable row per guest — this is where you record and correct replies. (Adding, grouping, and removing guests still happens in Guest List.)
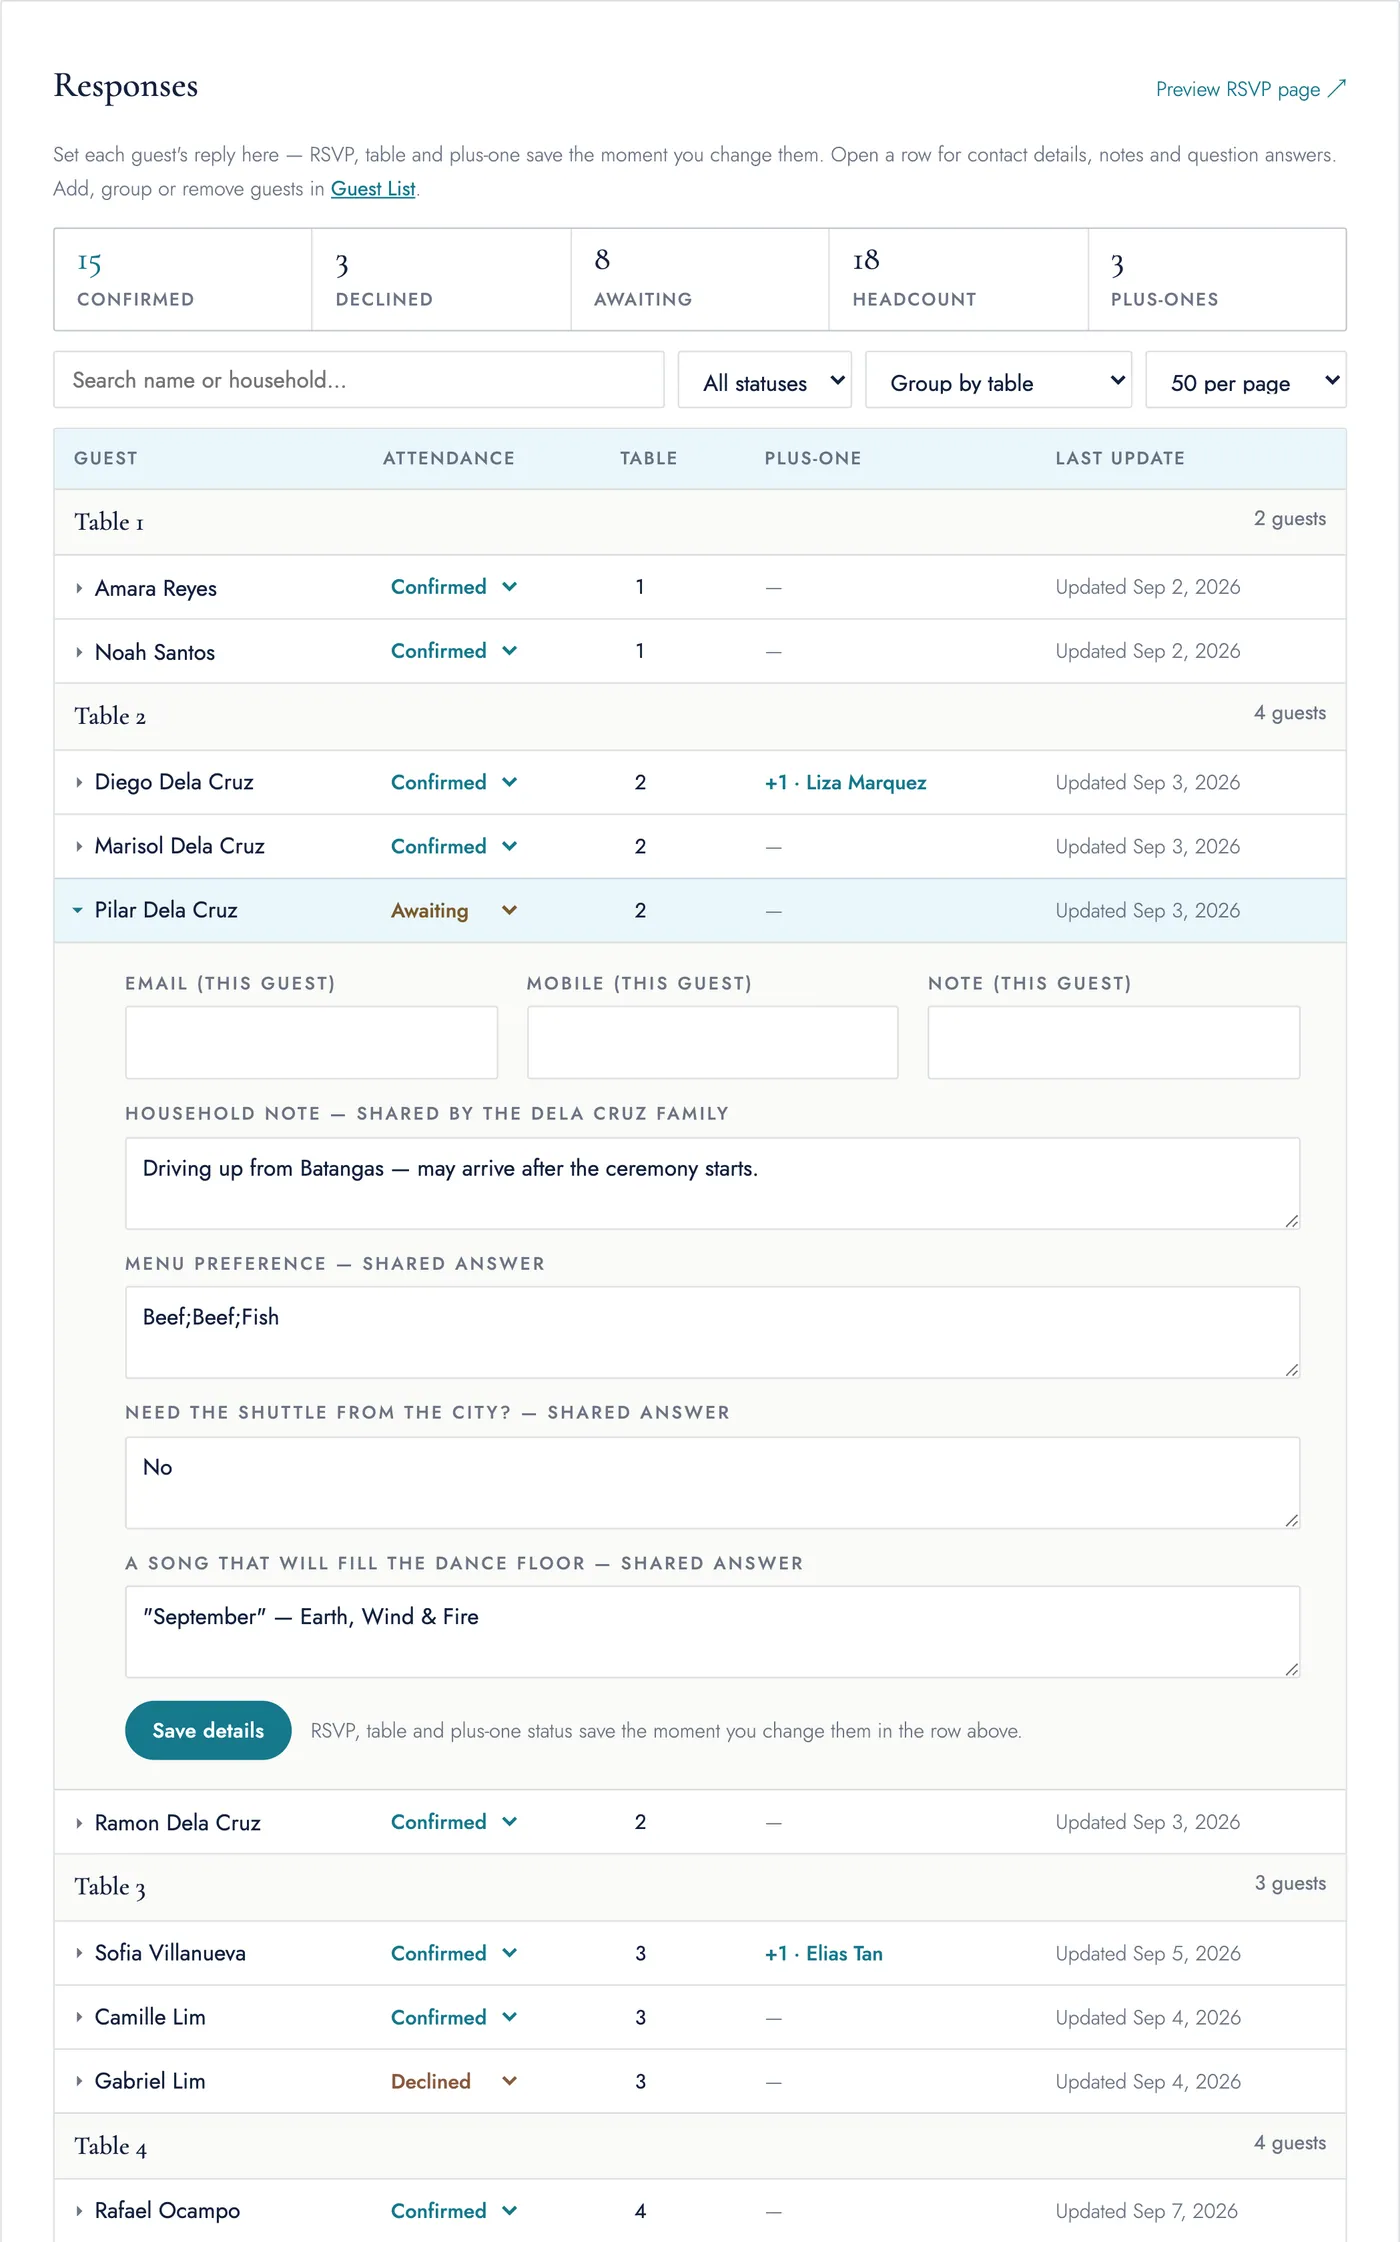
- Counts strip — confirmed, declined, awaiting, headcount, and plus-ones, updating as you edit. The choose-one / choose-several question breakdown (e.g. 18 chicken / 12 fish) sits below the table.
- Search, filter, sort & page size — search by name or household; filter by status; sort/group by table, household, first name A–Z, last name A–Z, or recently updated; show 25, 50, or 100 rows per page. Table and household views get sticky group headers; guests with no table sit under "No table assigned."
- Edit inline — a guest's attendance and table number save the instant you change them, no button. If a save fails it reverts and tells you.
- Open a row for the rest: that guest's email, mobile and personal note; the plus-one toggle and name (available once they're Confirmed); the household note and the household's question answers (both shared by everyone in the group). These save with the row's Save details button.
- You can record a reply for a household that never used the public page — handy for phone RSVPs or corrections. Setting someone back to Awaiting clears their reply.
- Export as CSV — everything, with custom-question answers as extra columns. Do this before anything important; it's your own backup.
8. Table Finder
Formerly the “Find My Table” card inside Responses — now its own section. An optional page for the wedding day: a guest scans a QR code at your welcome table, types their first and last name, and sees their table number and their household's table numbers — nothing else (no contact details, no RSVP status, no guest list). It's off by default. Turn it on here once you've assigned tables (in Guest List or Responses).
- Venue link & QR code — a separate link from your RSVP link, with a code that can't be guessed. Download the QR as a PNG and print it for the welcome table.
- Turn on automatically at — optional. Set a date and time (your device's clock) so lookups only open on the wedding day. Leave blank to allow them right away.
- Automatic shut-off — the lookup closes on its own about a day after your wedding date, even if you forget to switch it off.
- Reset Link — generates a new code and kills the old one. Use it if a printed QR leaks or you want a clean start.
- A name with no table — whether it's misspelled, declined, or not on the list — always gets the same "no table assignment for that name" message. The page never reveals who is or isn't invited.
9. Plan & Billing
Plans
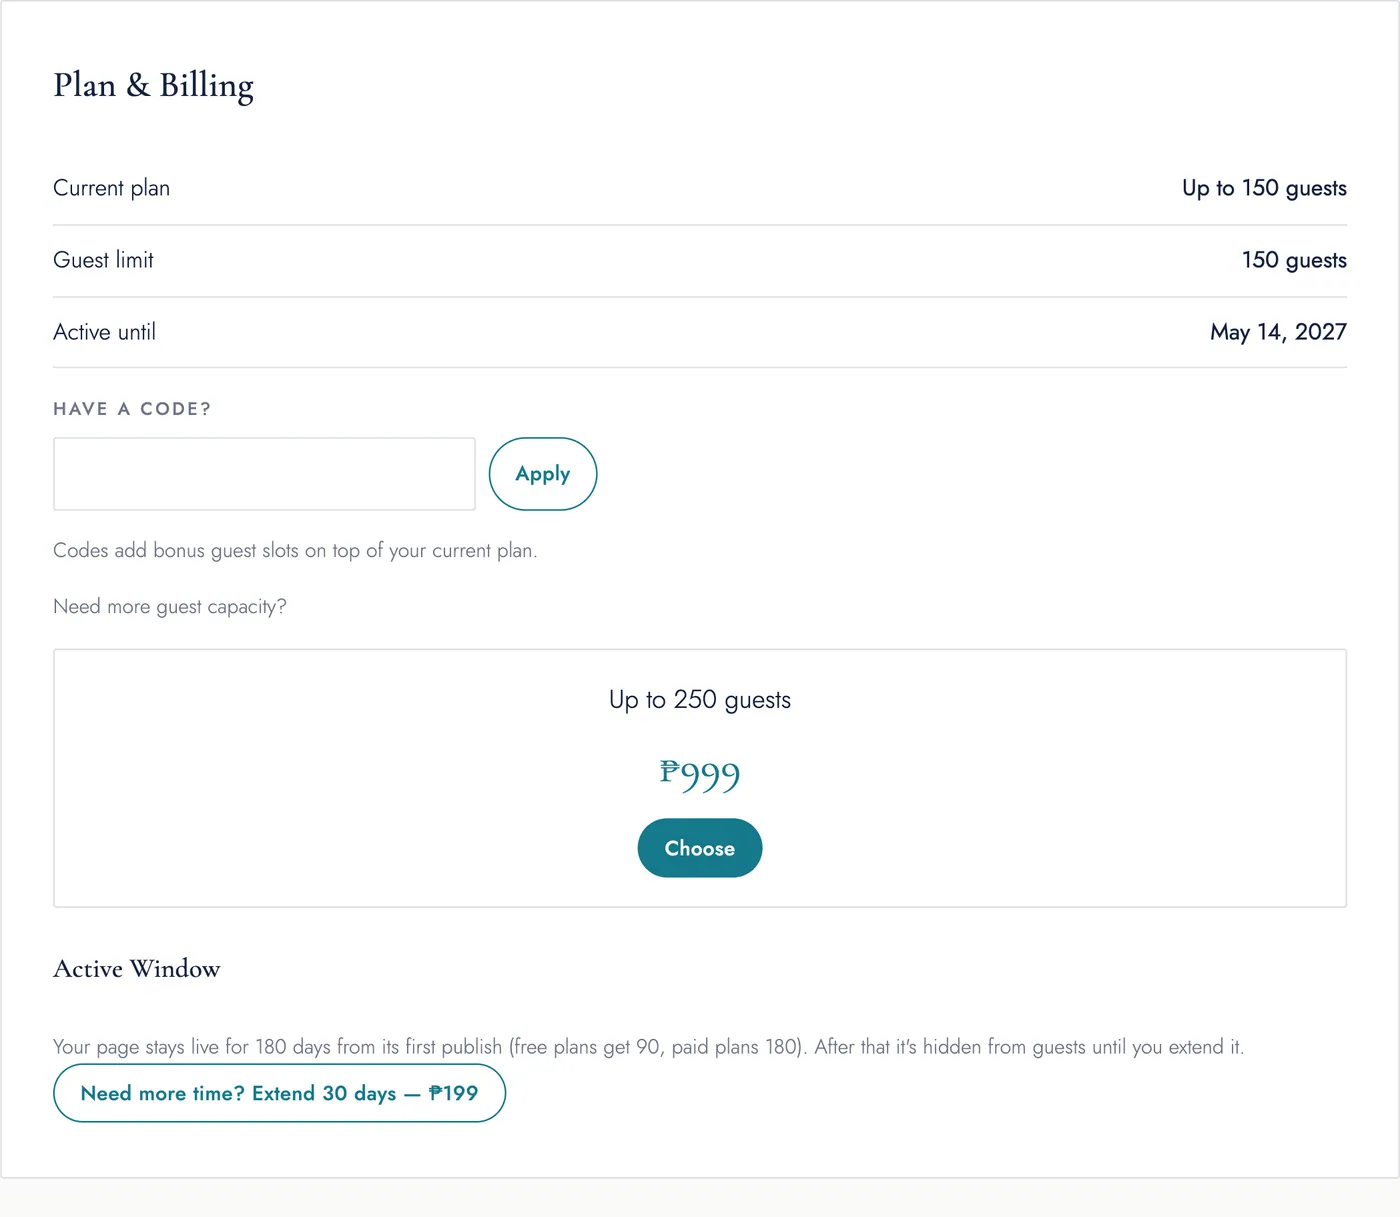
| Plan | Guests | Price |
|---|---|---|
| Free | 50 | ₱0 |
| 100 | 100 | ₱499 one-time |
| 150 | 150 | ₱699 one-time |
| 250 | 250 | ₱999 one-time |
Paid tiers are a one-time charge that only raises the guest cap — publishing itself is free on every plan. Payment is handled by HitPay (cards and GCash). Choosing a tier sends you to checkout and back; if it doesn't show as paid within a minute, refresh.
Redemption codes
If you were given a code (founding user, referral partner, comp), type it into Have a Code? and click Apply. Codes add bonus guest slots on top of your current plan and never lower your limit.
Active window
Your page goes live for a fixed window that starts the first time you publish (a draft can sit for months first):
- Free plan: 90 days.
- Paid plan: 180 days.
After the window ends, the RSVP page is hidden from guests until you extend it. The same screen offers Extend 30 days for ₱199, which you can buy more than once, and warns you when you're within 14 days of the deadline.
10. Account
- Change email — enter a new address; a confirmation link is sent there and the change takes effect when you click it.
- Change password — asks for your current password first, then the new one (10+ characters) twice.
- Forgot your password? Use the Forgot password? link on the sign-in page.
11. What your guests see
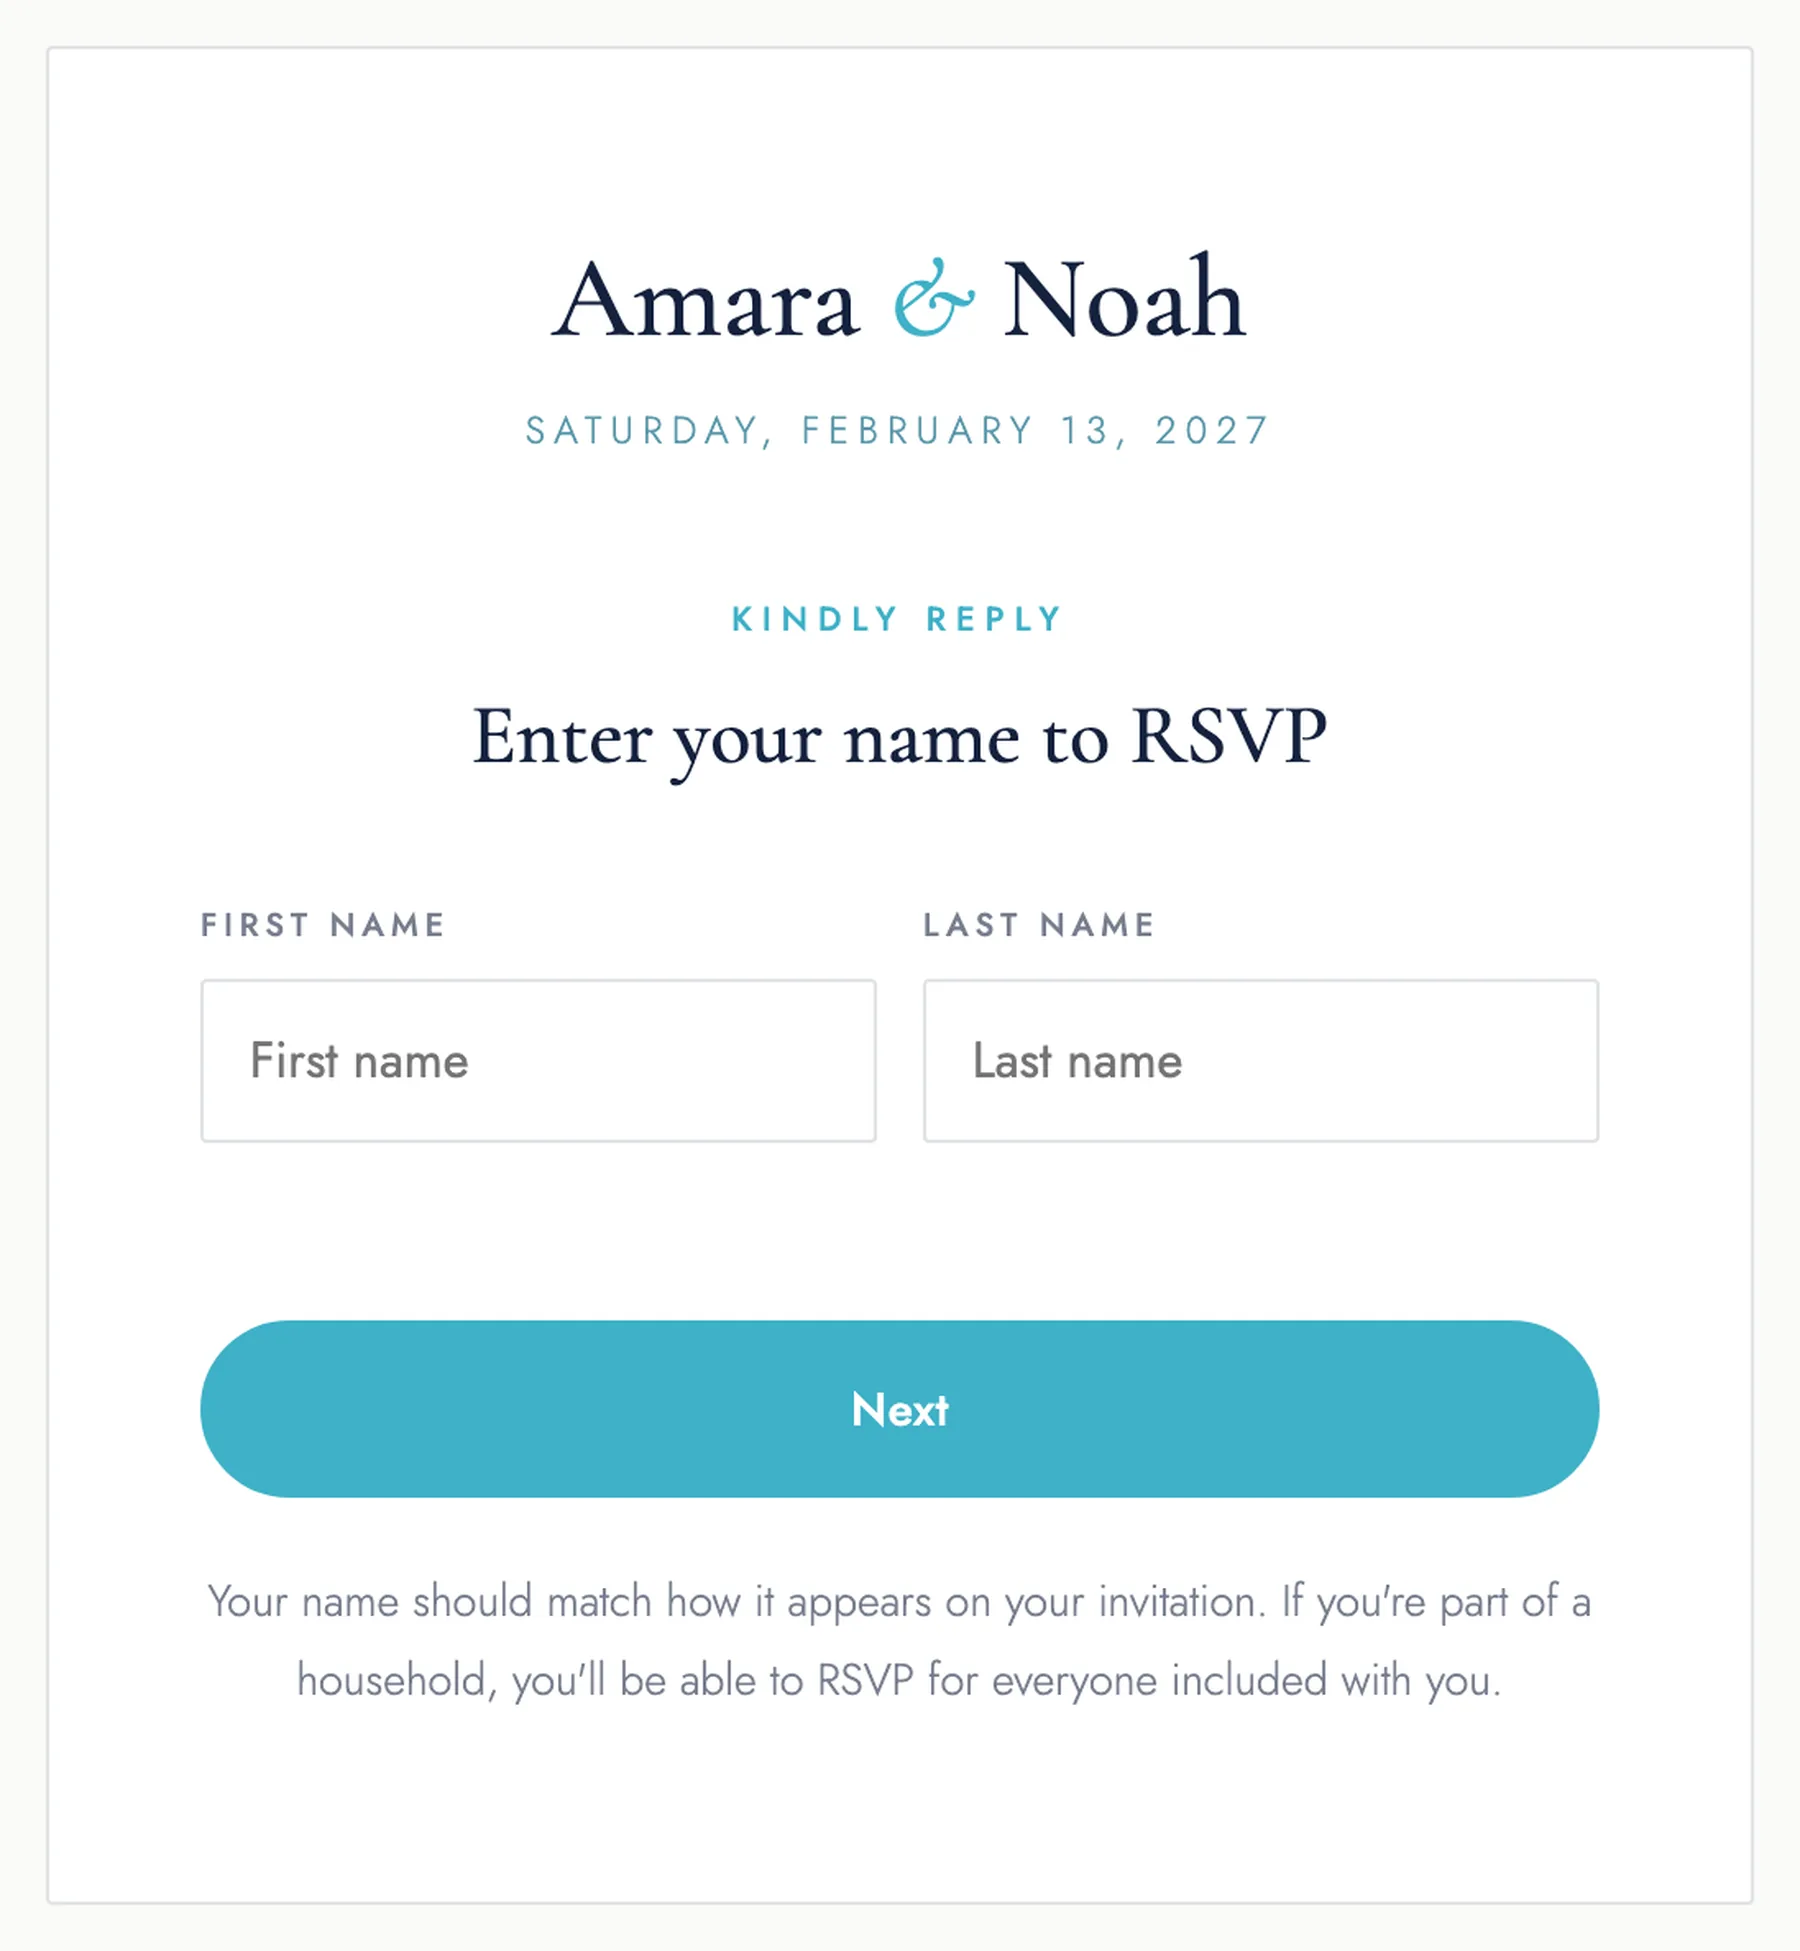
- Open the link. They see your names, date, and an "Enter your name to RSVP" prompt. (If it's still a draft, or the deadline/active window has passed, they see a polite closed message instead.)
- Type their name. It has to match a guest on your list exactly — first and last name. A single match goes straight through; if two households each have someone with that exact name, the guest picks "which household is yours?". A name that isn't on the list (or is misspelled) dead-ends on a "we couldn't find you" screen with your contact line, if you set one.
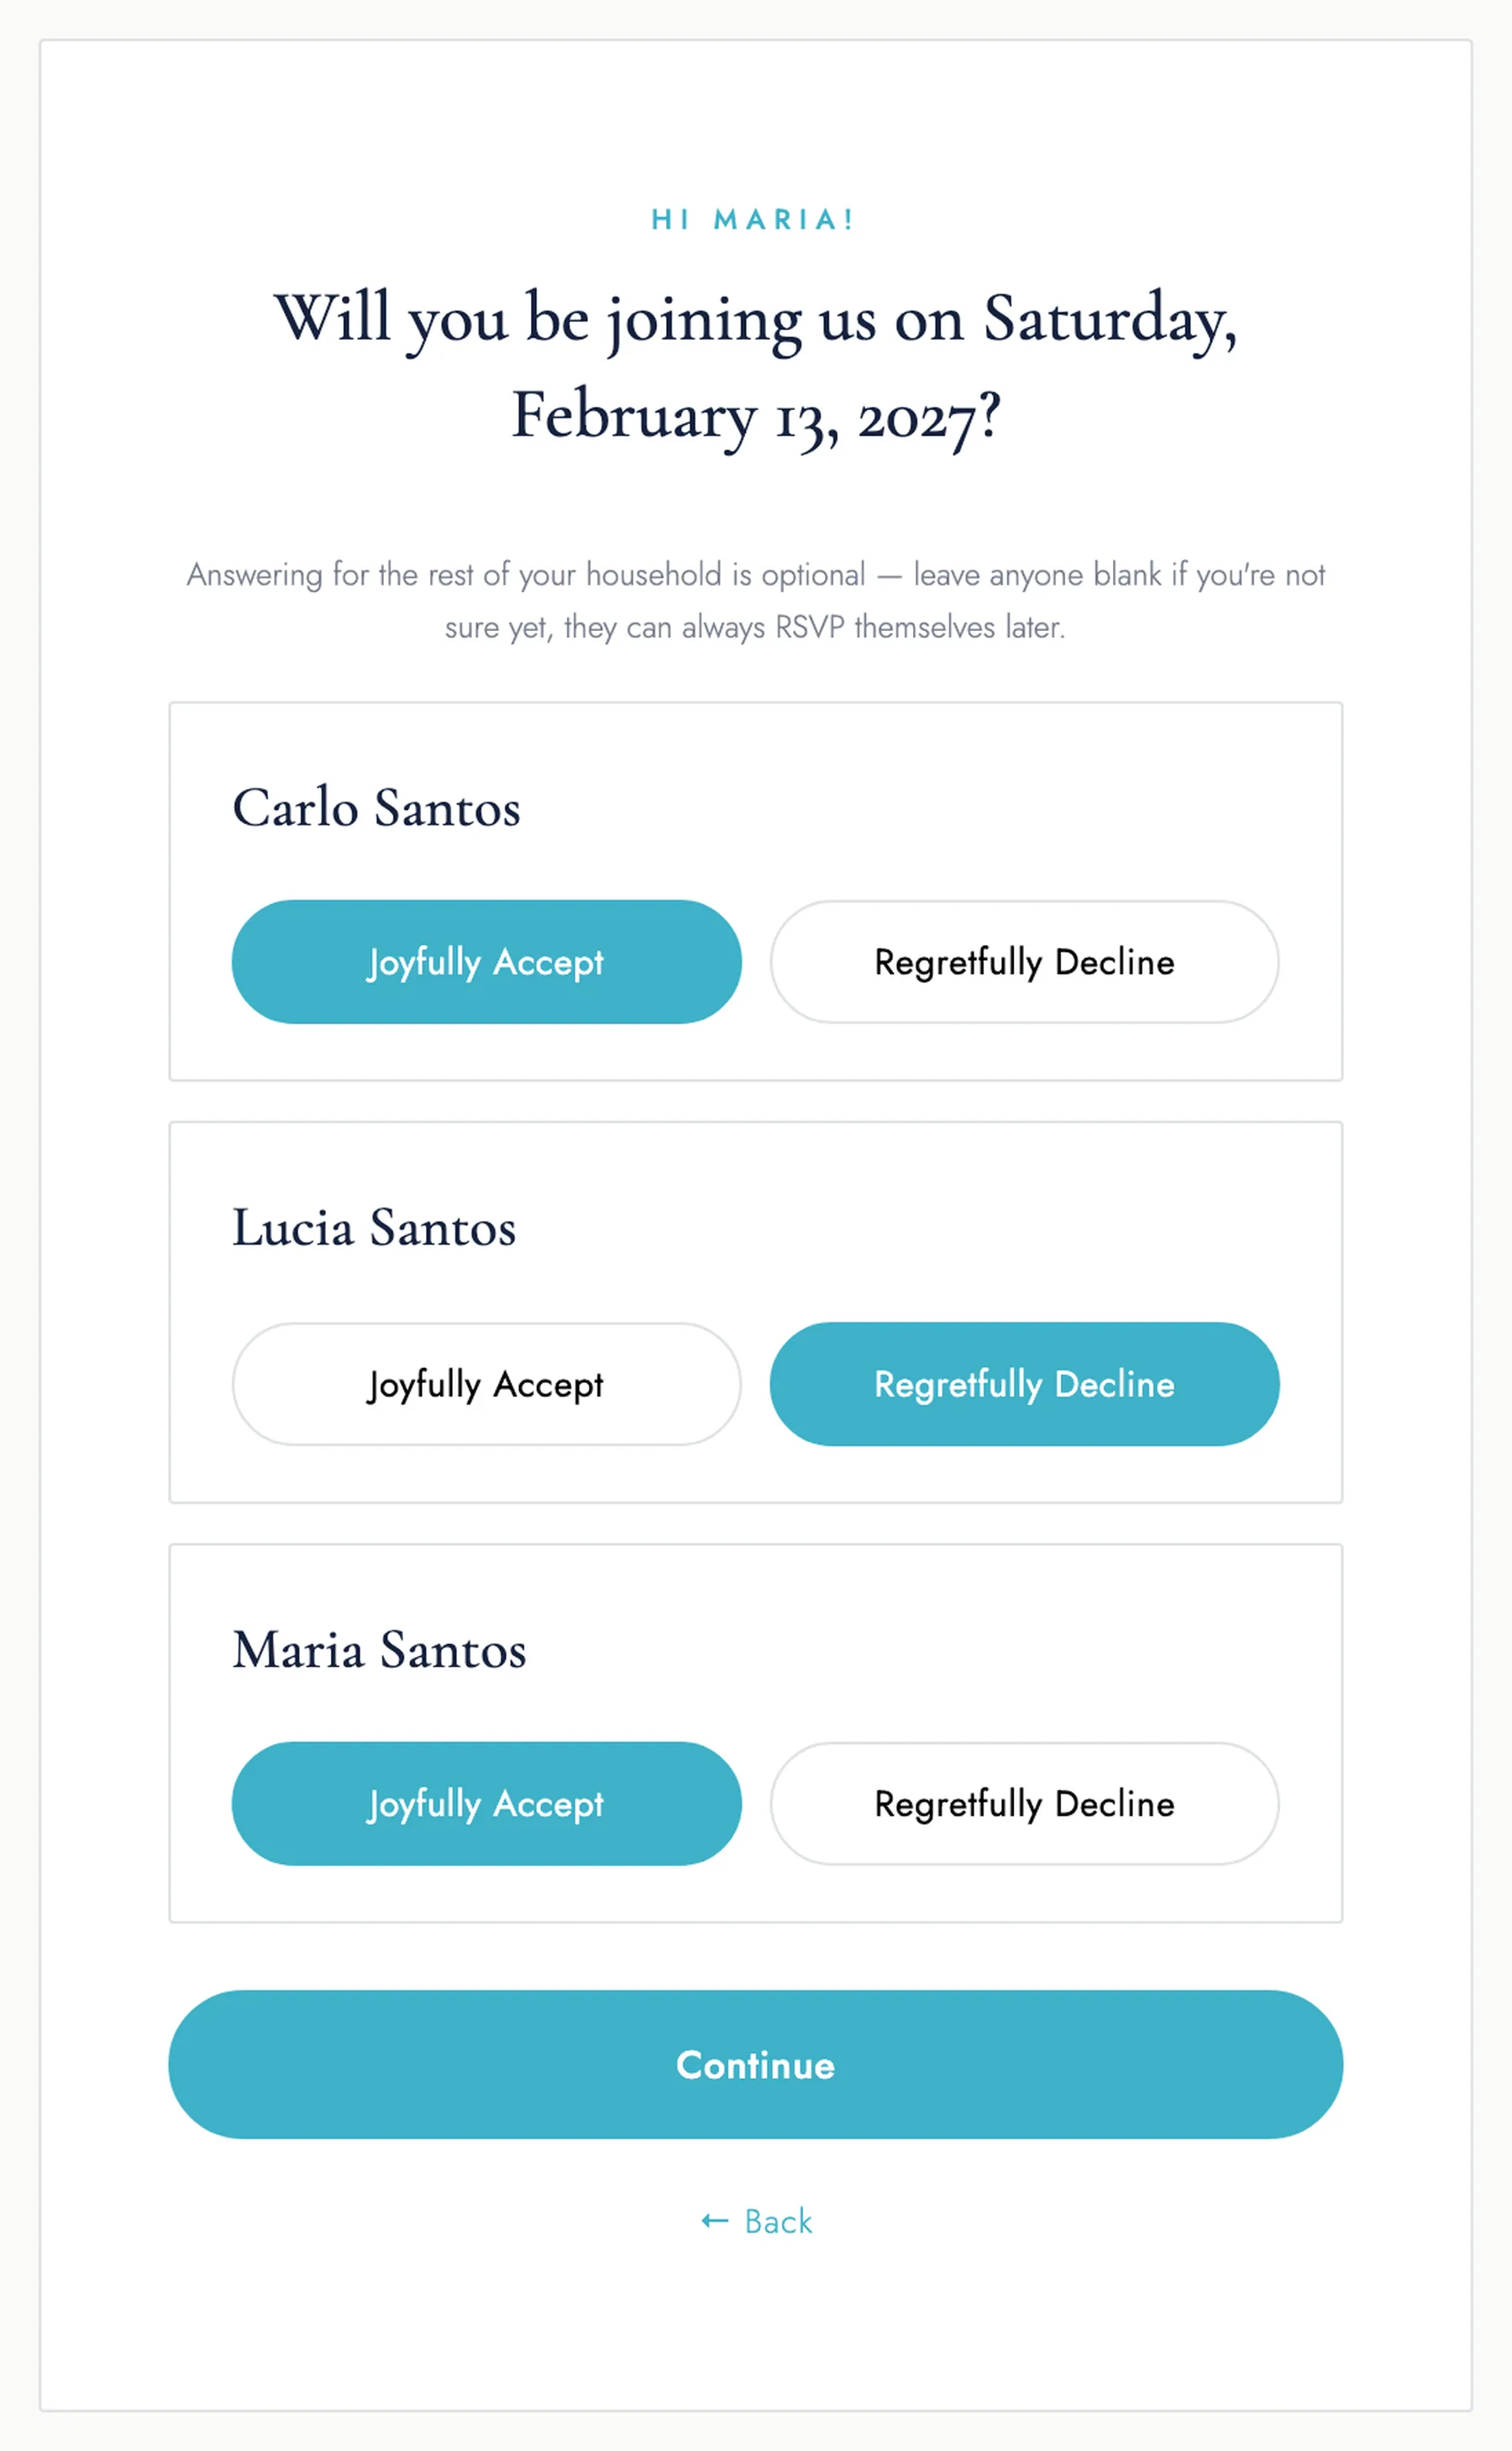
- Reply for the household. Yes or no for each person, a plus-one option where you allowed it, an optional email and mobile, a note, and any custom questions.
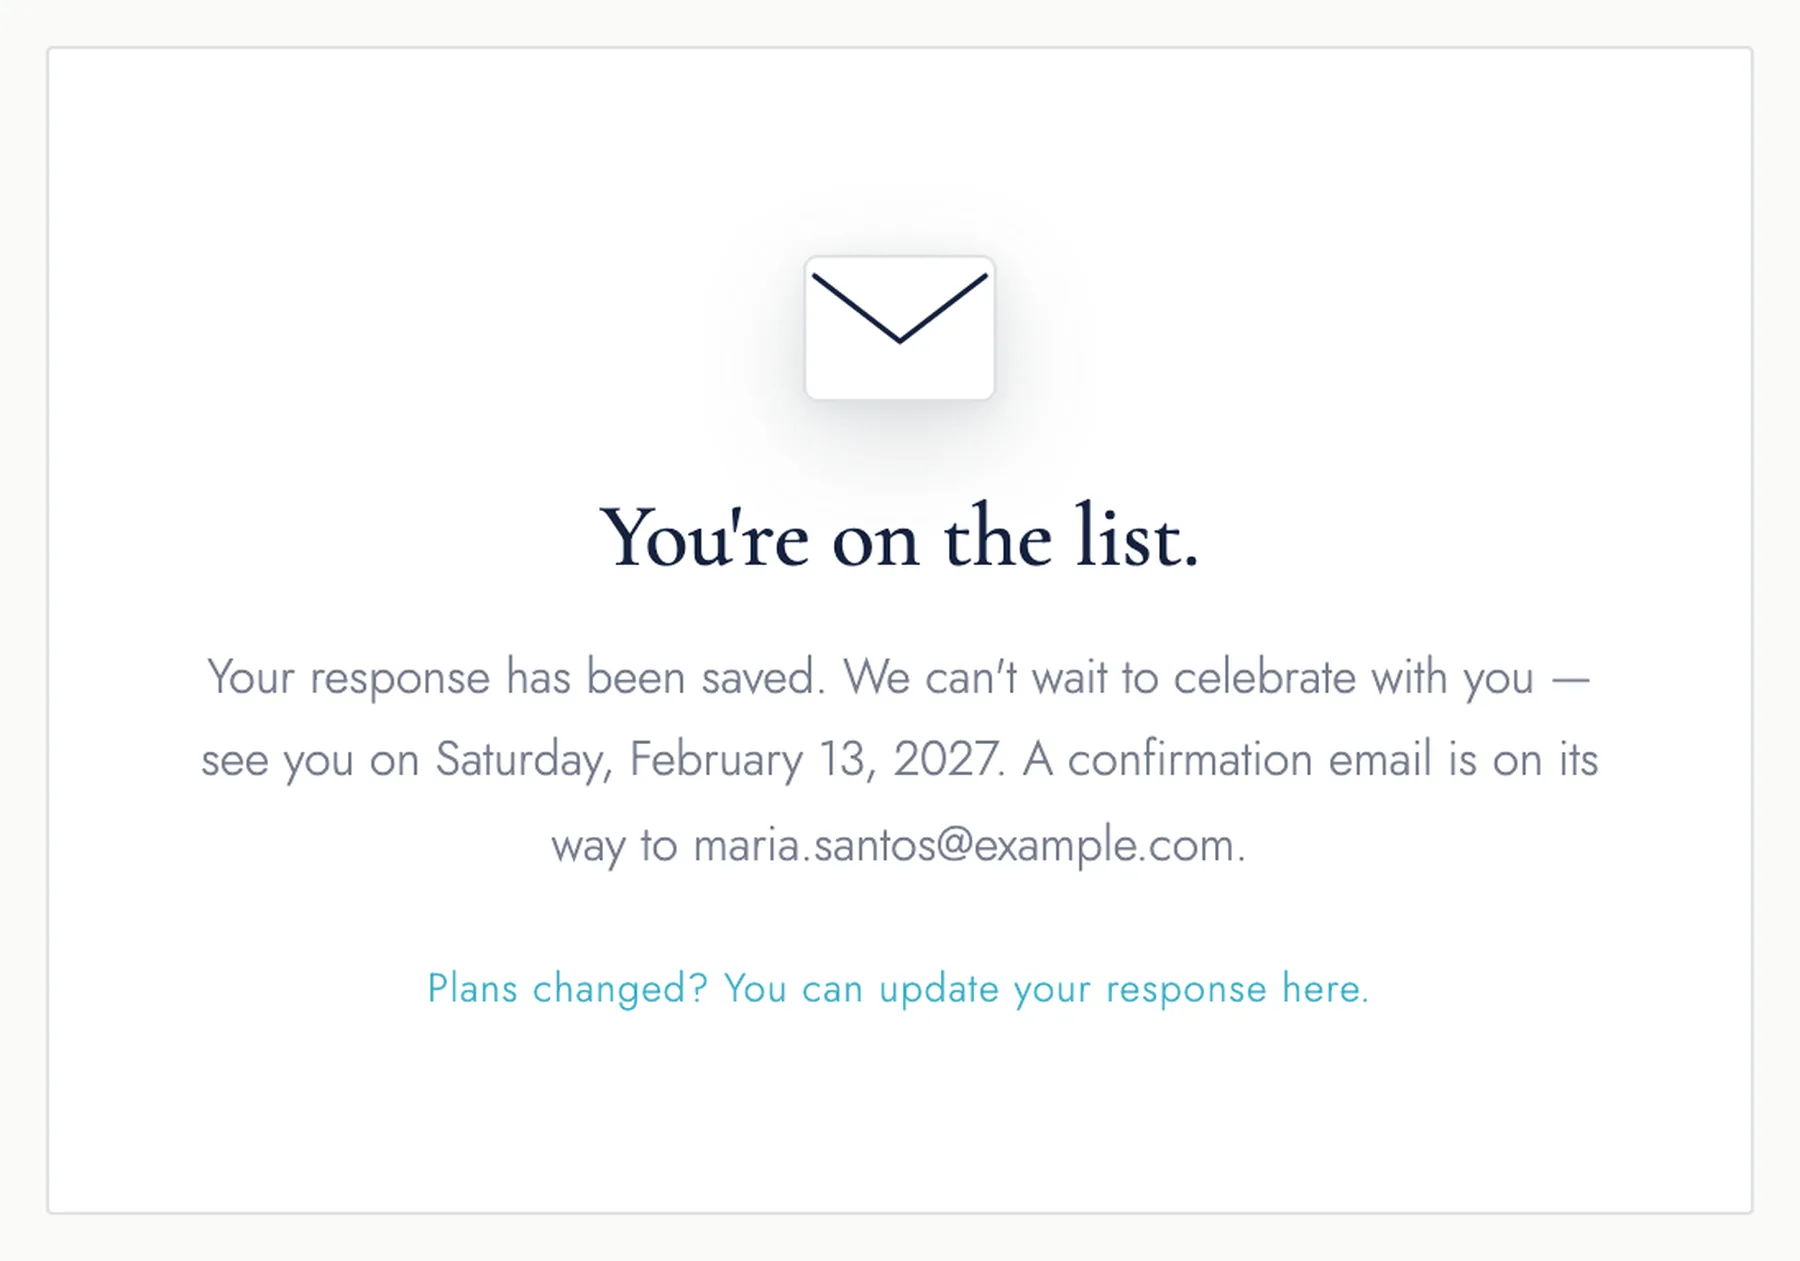
- Confirmation. They always get an on-screen confirmation. A confirmation email is also sent (best-effort) to the address on file. The reply is saved even if the email fails.
- Changes. They can revisit the same link, look up their name again, and update their answers any time before the deadline.
noindex — they won't show up in
search results. The link is the only thing gating the page, so share it directly rather than
posting it publicly.12. FAQ & troubleshooting
- A guest says the page won't load.
- Check Overview shows Live, confirm the link (the
?e=slug) matches, and check your active window hasn't lapsed under Plan & Billing. - A guest can't find their name.
- The lookup needs an exact first- and last-name match against your guest list, so check the spelling there against how it reads on their invitation (nicknames and dropped middle names are common culprits). Fix it in Guest List, or add the reply yourself in Responses. Set a contact line under Event Details so a stuck guest has a way to reach you.
- Can I have more than one event?
- Yes — your plan sets how many (see Plan & Billing), and you can add more with a stackable extra-event purchase. Switch between your events from the dropdown at the top of the dashboard sidebar.
- Do guests need an account?
- No. They only type their name.
- Can I change my page link after sharing it?
- Yes, on the Overview — but update your printed invitations, since the old link stops working.
- A confirmation email didn't arrive.
- It's best-effort and may land in spam. The RSVP is still saved — check Responses. Ask the guest to confirm the email address they entered.
- How do I get my final headcount?
- The Overview stats grid, or Export as CSV under Responses. Always confirm anything critical directly with guests too.
- Something's broken.
- Email hello@misserickamae.com with your page link and what you were doing.